In the part one of Shangchai SC27G diesel engine maintenance, we have already known how to st the detailed maintenance plan and task and methods of engine maintenance, such as checking engine periphery, checking fuel tank, checking air filter service indicator, checking oil level and so on. In this post, we are going to learn more instructions about engine maintenance like checking drive belt, cooling system, adding grease, belt tension and changing engine oil and oil filter.
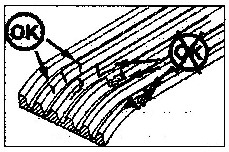
Perform visual check on the drive belt everyday for any intersecting cracks. Transverse cracks along the width direction of the belt are acceptable, while longitudinal cracks (along the length direction) that intersect with transverse cracks are not allowed. If any wear or abrasion occurs, replace it.
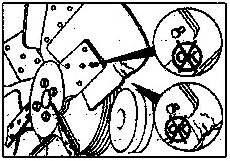
Perform visual check on the cooling fan for crack, loose rivet or blade bent or any other defect. The fan should be installed reliably. Tighten the fastening bolts or replace the damaged fan if necessary.
Warning: Damaged fan blade can cause serious personal injuW. Do not pull or pry the fan, and do not rotate the engine with the fan.
Check the intake hoses for any crack, as well as perforation, and clamps for looseness. Replace the hose(s) if any fault is found, and tighten clamp screw(s) if looseness is found to ensure the intake system free from leakage.
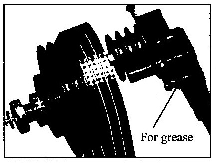
Add proper amount of sodium based lubricating grease in the small hole.
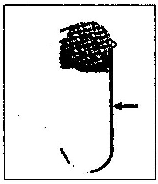
Apply a force of about 98 N on the middle point of the belt span between the two pulleys with finger by pressing and pulling, and check the position change of that point. The change should be within 8-12 mm. If it is out of the range, make adjustment.
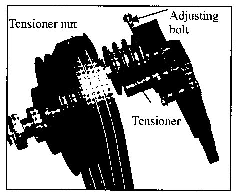
(1) Unscrew the tensioner nut and screw or unscrew the adjusting bolt to adjust belt tension.
(2) Tighten the tensioner nut t0 122-152 N*m.
Warning: Be careful when changing lubricating oil and oil filter because skin contact with the hot oil or hot engine surface can cause scald.
(1) Don't stop the engine until the temperature of the coolant reaches 60℃, then remove the oil drain plug on the oil pan, scrap the washer and drain the lubricating oil.
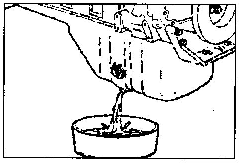
Caution: Do not drain lube oil when the engine is in cold state at which foreign particles has deposited and attached to the bottom of the oil pan, and will not drain with the oil. When the lube oil is warm, foreign particles suspend in it and can easily drain with it.
(2) Clean the installation surface of the oil drain plug on the oil pan. Install the drain plug with sealant Tonsan 1567F and tighten it t0 60 -70 N*m.
(3) Clean the outside surface of the oil filter. Remove the oil filter with tool and scrap it. There are two oil filters (over the oil cooler on each engine side) and both two should be replaced at the same time.
(4) Clean the seal surface of the filter head, and there should be no old O-ring left.
(5) Do not fill the new filters with clean oil. Only apply a light film of Vaseline or clean lubricating oil to the O-rings on the new filters to form a lubricating film before installation.
(6) Turn the filter by hand until the O-ring contacts the sealed surface of the filter head, and further tighten it t0 45 t 5 N*m or 3/4 to one of a turn with tool.
(7) Open the filler cap (near the lower part of the cylinder block), and fill the engine with clean lubricating oil until the oil level is near the high level mark in the oil dipstick. The lubricating system capacity is about 65 L and oil pan capacity about 42 L.
(8) Start the engine and keep it running at idle, and then check the oil filter and drain plug for oil leak.
(9) Check the oil level at idle or low speed. If required, add engine oil until it is near the dynamic high level mark (the mark 2) in the oil dipstick.
(10) Install the filler cap and tighten it until you feel suitable.
(1) Clean the outside surfaces of the fuel filters (two filters). Remove the filters with tool and scrap them.
(2) Clean the filter heads and its seal surfaces. There should be no old O-ring left.
Note: There is two fuel filter, change them at the same time.
(2) Before installing a new fuel filter, fill it with clean fuel from the 8 peripheral holes. The fuel level should be 3-15 mm below the threaded hole. Apply a light film of Vaseline or clean lubricating oil on the O-ring on the new filter to form a lubricating film.
Caution: Do not add fuel from the central hole of the filter.
{4) Screw the filter by hand until the O-ring contacts the seal surface of the filter head, and further tighten it to 45± 5 N?*m or 3/4 to one of a tum with tool.
The first stage fuel filter is also spin-on type. Refer to "Changing fuel filter (second stage)" for replacement procedure
Refer to the instruction on the filter for the removal directions of the filter and water container.
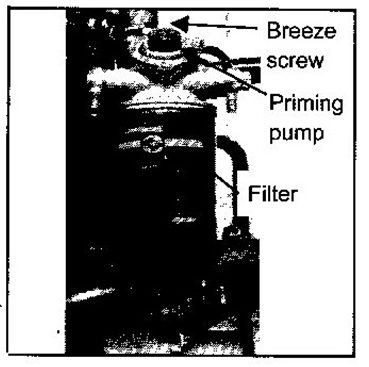
If the engine has not been used for a long time or first and second stage fuel filters are changed, air will enter the fuel system. It is required to prime the fuel system as per following steps:
(1) Loosen the air breezing screw (straight line head) on the top of the priming pump.
(2) Press the priming pump to prime until there is no bubble visible in the fuel that outflows from the plug.
(3 Tighten the plug to 10 N*m.
Caution: Priming the fuel system is required if air enters the fuel pipeline due to untimely fuel supplement or there is air in the fuel system due to other reasons.
For the information about Shangchai G series diesel engine operation and maintenance, please visit:
Shangchai G Series Diesel Engine Operation And Maintenance Manual
Shangchai G Series Engine Nameplate And Specifications
SC27G Diesel Engine installation and Connection
SC27G Diesel Engine Operation And Engine Start
SC27G Diesel Engine Maintenance
Copyright © Guangxi Dingbo Generator Set Manufacturing Co., Ltd. All Rights Reserved | Sitemap
Update cookies preferences