Before working on the alternator (Leroy-Somer Low Voltage Alternator), ensure that it cannot be started by a manual or automatic system by isolating the power (disconnection of all electrical, mechanical power, etc) in any cabinets and that you have understood the system operating principles.
4.1 - Mounting the PMG 0, 2, 3 and 7
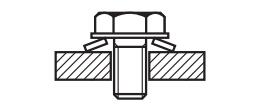
Make sure the bevel washers are fitted the right way round.
- Remove the alternator NDE shield seal.
- Mount the PMG housing assembly [A] on the shield, take care to position the cable through-holes at 9 o’clock as seen from the non-drive end, and tighten the 4 HM6 screws to a torque of 8.3 Nm (PMG 0, self-tapping screws tightened to 10 Nm).
- Put a coating of anti-vibration adhesive on the tie rod and screw it tight on the alternator shaft extension.
- Mount the magnetised rotor [C] on the shaft adapter [B].
WARNING: magnetic force (risk of pinching).
- Using 2 M10 threaded rods screwed into the rotor, slide the assembly onto the tie rod.
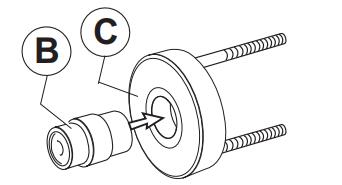
- Once the rotor is in position, remove the M10 tie rods.
- Mount the cable gland washer.
- Lock the assembly with the M10 nut (PMG 0, 7) to a torque of 30 Nm or the M16 nut (PMG 2 and 3) to a torque of 116 Nm.
- Pierce the cover (Ø 21 hole) or remove the plastic plug on the NDE panel.
- Fit the plastic sheath and its two ferrules, while inserting the 3 PMG wires.
- Close the PMG with the cover [E].
4.1.1 - Electrical connection of a PMG on a Shunt machine
If mounting a PMG 0, the R220 must be replaced by R438.
If mounting a PMG 2, the R250 must be replaced by R450.
If mounting a PMG 7, the R250 must be replaced by R438.
- Disconnect the connection wires from the R220 or R250 and remove the AVR.
- Take out both the voltage reference wires, marked 2 and 3, by removing them from the terminals (T8 and T11) in which they are inserted.
- Use these same wires for voltage sensing on the R450/R438 by inserting them in terminals T2 (wire 2) and T3 (wire 3).
- Fit the AVR support plate fitted with the R450/R438 (2 HM6 screws tightened to 10 Nm / PMG 0, 4M5 self-tapping screws tightened to 6 Nm).
- In the terminal box, stick the self-adhesive bases on the NDE shield and on the terminal block to bring the PMG wires into the AVR.
- Next, attach the sheath with the PMG wires to the self-adhesive bases using plastic clamps.
- Make a bridge around the shield spigot to avoid the sheath quickly becoming damaged and the risk of a short-circuit.
- Connect the 3 PMG wires (14/15/16), the 2 exciter field wires (5/6) and the 2 previously mentioned voltage sensing wires (2/3) according to the internal connection diagram in the alternator maintenance manual.
- Modify the connection by replacing the single jumper on the connector located on the terminal box rear panel with 2 jumpers (except PMG 0).

CAUTION: With PMG excitation, check that the ST9 jumper on the AVR is open. After operational testing, replace all access panels or covers.
4.1.2 - Electrical connection of a PMG on an AREP machine
- In the terminal box, stick the self-adhesive bases on the NDE shield and on the terminal block to bring the PMG wires into the AVR.
- Next, attach the sheath with the PMG wires to the self-adhesive bases using plastic clamps.
- Make a bridge around the shield spigot to avoid the sheath quickly becoming damaged and the risk of a short-circuit.
- Connect the 3 PMG wires (14/15/16), to terminals X1, X2, Z2 on the AVR. The 4 auxiliary winding wires X1.X2.Z1.Z2 should be isolated using the domino fitting supplied with the kit. Both the field wires (5/6) and the voltage sensing wires (2/3) remain in place.
CAUTION
When using a PMG as an AREP alternator, a modification of the instability adjustment (regulator stab potentiometer) may be necessary.
Check that the ST9 jumper on the AVR is open.
After operational testing, replace all access panels or covers.
For initial assembly, provide the mounting flange and the spacer (see spare parts). Make sure the bevel washers are fitted the right way round.
- Remove the air intake grille from the alternator NDE shield.
- Put a coating of anti-vibration adhesive on the tie rod and screw it tight on the alternator shaft extension.
- Mount the magnetised rotor [C] on the shaft adapter [B].
WARNING: magnetic force (risk of pinching).
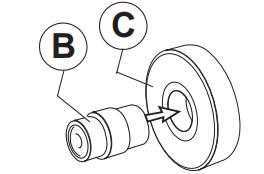
- Position the assembly on the alternator NDE shaft extension.
- Mount the cable gland washer.
- Lock the assembly with the M20 nut (torque of 254 Nm).
- Mount the stator in the PMG housing and tighten the HM 6 screws to a torque of 8 Nm.
- Fit the PMG stator assembly on the alternator NDE shield.
- Tighten the five HM 10 stator assembly screws to a torque of 20 Nm.
- Finally, fit the air intake grille.
Sectional diagram of the PMG 4
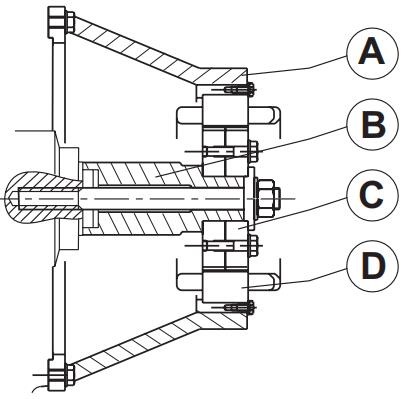
Caution: Make sure the bevel washers are fitted the right way round.
- Remove the alternator NDE shield seal.
- Mount the magnetised rotor [C] on the shaft adapter [B].
- Position the assembly on the alternator NDE shaft extension.
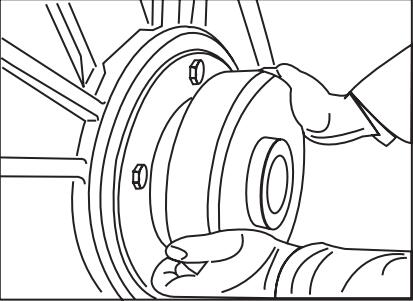
- Position the large cable gland washer on the two rotor pins.
- Tighten the M16 screw with its serrated washer to a torque of 170 Nm.
- Screw two 200 mm long M6 threaded rods into the alternator NDE shield on the opposite side.
- Slide and position the PMG housing assembly [A] on the NDE shield spigot, turning the cable exit hole to 9 o’clock as seen from the alternator non-drive end.
- Slide the PMG stator onto the threaded rods, taking care to orient the flying leads opposite the hole in the housing.
- Once the stator has been brought close and correctly oriented, screw two M6x90 screws with the bevel washers and unscrew the M6 tie rods, then finish mounting with the other two M6x90 screws.
- Tighten the four M6 screws in a cross to a torque of 8.3 Nm, taking care to bring the stator close first.
- Remove the plastic plug on the NDE panel. - Fit the plastic sheath and its two ferrules while inserting the 3 PMG wires.
- Close the PMG with the cover [E]. Electrical connection is same to 4.1.2
- Remove the protection cover from the rear flange of the alternator (4 hexagonal screws).
- Fit the housing [A] into the rear flange, then fasten it using the 4 M6 hexagonal screws (torque: 8.3 N.m).
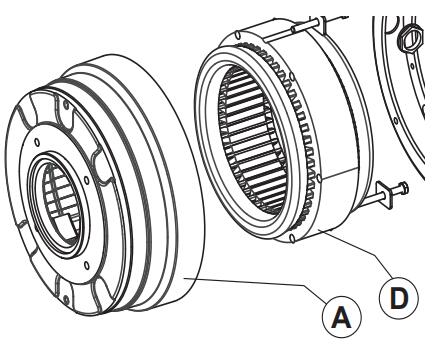
- Slide the PMG stator [D] into the housing [A].
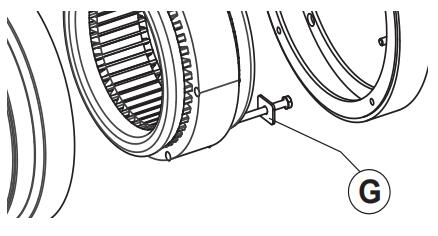
- Fasten the stator using M6 screws + washers [G] (torque: 8.3 N.m).
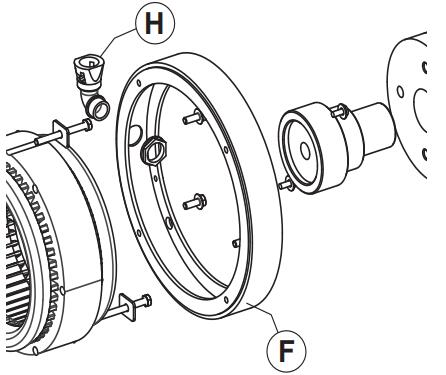
- Position the spacer housing [F] while inserting the stator output wires through the duct [H], then fasten the spacer housing using the 4 M5 screws (torque: 5 N.m).
Position the rotor [C] on the out-of-round on the shaft [B], insert the assembly into the PMG, and then tighten with the screws and washers [I] (torque: 115 N.m).
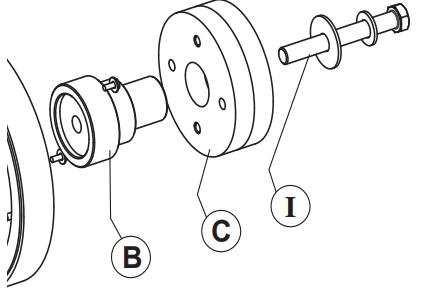
- Fasten the cover plate [E] using the 4 M5 screws (torque: 5 N.m).
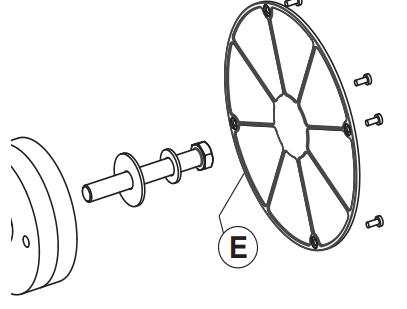
Electrical connection (see § PMG 4).
- Remove the protection cover plate on the NDE shield seal.
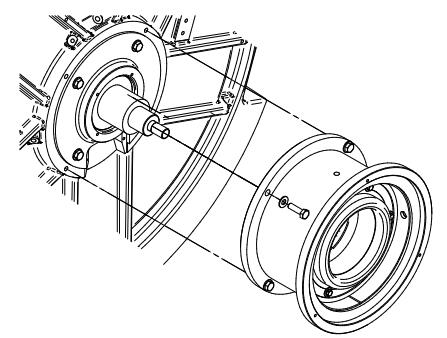
- Mount the shaft adapter [B] onto the alternator shaft with the tie rod M20 [I] (torque: 313 N.m) and anti-vibration adhesive.
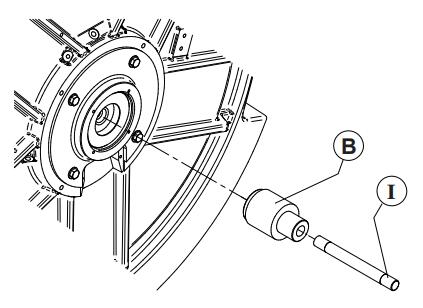
- Heat the PMG housing [A] at 100°C.
- Slide the PMG stator [D] into the housing while protecting the stator output wires, and lock using the 4 M10 screws (torque: 37.7 N.m).
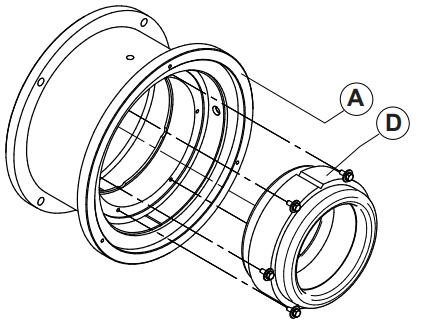
- Mount the PMG stator assembly onto the alternator NDE shield seal.
- Screw the 2 tie rods onto the PMG rotor [C] to facilitate assembly.
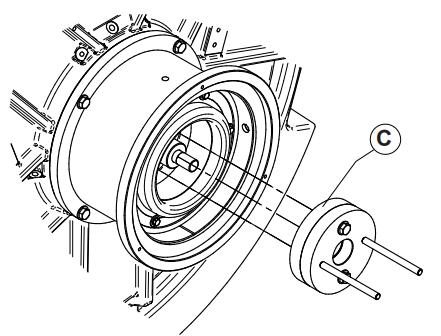
- Insert the PMG rotor [C] onto the shaft adapter [B] and finish the assembly by fitting the centring washer.
- Screw the nut and washer onto the tie rod to lock the PMG rotor assembly onto the alternator’s shaft.
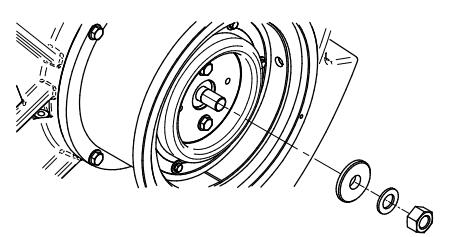
Caution: inspect the assembly: prevent any contact between the magnetised stator and rotor.

Mounting on auxiliaries side
- Mount the connectors, sheath and plastic nut, the offset loop flange, nut and screw, and the plastic cap before electrical wiring.
Maybe You Also Like:
Introduction of Leroy-Somer Alternators
Leroy-Somer Low Voltage Alternators - 4 Pole Installation and Maintenance
Copyright © Guangxi Dingbo Generator Set Manufacturing Co., Ltd. All Rights Reserved | Sitemap
Update cookies preferences