The contents are intended for quick guidance and supplement to the user who is using SmartGen BAC06 series switch-type battery charger. Please read the standard manual for more details.
1. Summary
BAC06 series switching battery charger using the latest switch power components is designed for charging lead-acid starting battery float charge. The maximum charging current for 12V charger is 6A and the maximum charge current for 24V charger is 3A.
2. Performance and characteristics
a) Designed in switching power structure, wide range of AC voltage input, small volume, light weight and high efficiency;
b) Two-stage charging method (constant current firstly and then constant voltage). fully considering charging property of the lead-acid battery, can avoid overcharging and extent the battery life to the fullest;
c) With short circuit and reverse connection protection;
d) Charging voltage and current can be adjusted via potentiometer on the spot;
e) LED disply: AC power indication and charging indication ;
f) Horizational type for installation of BAV06A, easy to install;
g) Vertical type for installation of BAC06V, further decreased installation dimension.
3. Charging Principle
Considering charging property of the lead-acid battery, BAC06V battery charger uses 2-stage charging method and charge mode is “constant-current”. When battery voltage is under the threshold, it is charging in constant-current mode; When the battery voltage is higher than the threshold, the charging current is decreasing as the battery voltage is rising until it reaches the set voltage, and then charge mode is turned into “floating charge”. Charge current is gradually reducing and battery voltage is rising up to the set value. When charging current is lower than 0.3A, the battery is basically fully charged (charging indicator eliminates). Afterwards, charging current will offset self-discharge of the battery. Thus the charger can maintain a full charged condition and extend the battery life.
4. Specification
Category | Items | 12V | 24V | |
input | Nominal Voltage | AC (95~280)V | ||
Max.AC Voltage | AC (90~305)V | |||
AC Frequency | 50Hz/60H | |||
Max.Input Current | 2A | |||
Max.Efficiency | 85% | |||
Output | Charging Current | 4A-6A, (Error ±2%) | 2A-3A,(Error±2%) | |
Factory Charging Current | 6A | 3A | ||
Max.Power | 85W | |||
Min.Voltage | 7.5V | |||
No-load Voltage | 13.8V, (Error ±1%) | 27.6V, (Error±1%) | ||
No-load power consumption | <3W | |||
Insulation | Insulation Resistance | Between input and output, input and shell both are: DC500V 1min RL≥500MΩ | ||
Insulation Voltage | Between input and output, input and shell both are: AC1600V 50Hz 1min Leakage current: IL≤3.5mA | |||
Working | Working | (-30-55)℃ | ||
Condition | Temperature | |||
Storage Temperature | (-40-85)℃ | |||
Working Humidity | 20%RH-93% RH(No condensation) | |||
Profile | BAC06A | Weight | 0.65kg | |
Dimension | 143 x 96 x 55mm (LxWXH) | |||
BAC06V | Weight | 0.69kg | ||
Dimension | 154.4 x 94.5 x 56 mm (LxWXH) | |||
5. Setting
5.1 Voltage Adjustment
When adjusting the voltage, disconnect the battery from the charger, and then measure the output voltage of the charger while adjusting voltage potentiometer (VOLT) to a proper value.
5.2 Current Adjustment
Connect battery output firstly. When battery voltage is under 25.0V (12.5V), adjust the current potentiometer (AMP) and set proper charge current potentiometer, which is recommended.
6. Operation
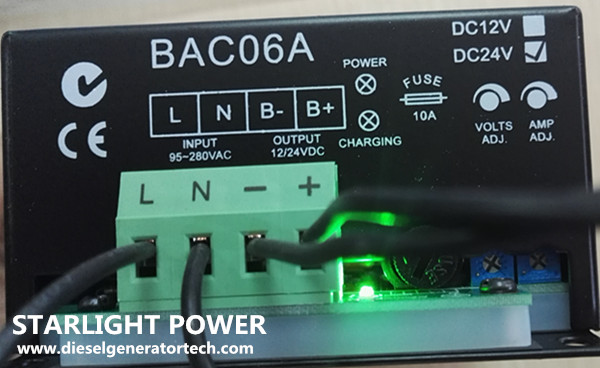
a) Terminal L and N connect AC 220V, using multi-strand BVR 1mm2 copper wires.
b) Terminal B+and B_ connect battery positive and negative, using multi-strand BVR1.5mm2 copper wires.
c) POWER: Power indicator. When charger works, it’ll illuminate.
d) CHARGING: Battery charging indicator. When charging current is over 0.3A, it will illuminate.
e) VOLT: Voltage adjustment potentiometer.
f) AMP: Current adjustment potentiometer.
g) Output: 10A fuse. Reverse connection will cause fuse blown. After correcting the connection and changing another fuse, it can continue working.
Note:
1) Because there is diode and current-limiting circuit inner the charger, it can be used together with charging generator, and there is no need to disconnect the charger when cranking.
2) During gen-set is running, high current will cause voltage drop in charging line, so recommend separately connecting to battery terminal to avoid disturbance on sampling precision.

7. Troubleshooting
7.1 Fault Diagnosis
Output terminal of battery charger short circuit or battery reverse connection may blow the charger output fuse. In that case, after connecting AC power supply, charger green LED lights up but output terminal without voltage outputting, and then remove the output fuse tube to visually observe whether fuse is blown or not, if condition permit, multimeter can be used to measure the fuse status.
a) If output terminal 10A fuse is blown, users only need to change the same capacity fuse.
b) If output terminal isn’t blown or battery without outputting after changing the fuse, battery needs to depot repair.
c) Fuse burn emergency method: using conductive metal wire short connected burnt fuse, and then change the fuse later.
7.2 Procedures of Changing Fuse
a) Press hard on the slotted screwdriver, screw counter-clockwise and then take out the fuse.
b) Put a new fuse into the block, press the slotted screwdriver and screw clockwise.
Note: improper operation or over tightening may damage the block.
8. Order information
When ordering BAC06 Series chargers, please chose charger types according to installation and voltage as the chart below:
Model | Installation | Battery Type | Rated Output Current |
BAC06A-12 | Horizontal | 12V | 6A |
BAC06A-24V | 24V | 3A | |
BAC06V-12V | Vertical | 12V | 6A |
BAC06V-24V | 24V | 3A |
Copyright © Guangxi Dingbo Generator Set Manufacturing Co., Ltd. All Rights Reserved | Sitemap
Update cookies preferences