6.4.1 Cleaning intervals
The degree of soiling of the combustion air cleaner depends on the amount of dust contained in the air and the size of the filter used. If very dusty air is to be expected, a cyclone-type precleaner can be fitted to the air cleaner.
Consequently, the cleaning intervals can not be fixed generally, but have to be determined from case to case.
When a dry-type air cleaner is used, when indicated by the service indicator or switch
Air cleaner serving is needed when:
- Service Indicator, the red sector 1 is fully visible when the engine is off.
- The yellow pilot light comes on when the engine is running
After having carried out service work, reset the signal by pressing the button of the service indicator. The service indicator is ready to resume its function.
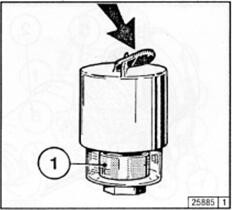
6.4.2 Dry-type Air Cleaner
Dust Discharge Valve
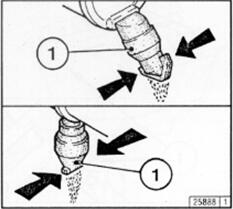
Empty dust discharge valve 1 by pressing apart lips of discharge slot as indicated by the arrow.
Clean discharge slot from time to time
Remove any caked dirt by pressing together the upper section of the valve.
Filter cartridge
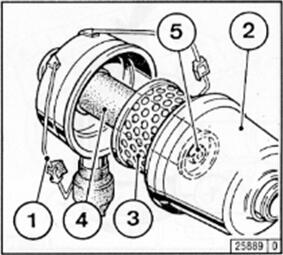
Release fastening clamps 1.
Take off hood 2 and remove cartridge 3.
Clean cartridge 3
Blow through with dry compressed air (max, 5 bar) from inside to outside or in difficult cases, tap out, taking care not to damage the cartridge or wash out according to manufacturer’s instructions
Check cartridge for damage to filter paper by shining the paper through with a light, and inspect sealing element. Renew if necessary.
Cartridge 3 shall be replaced at least once a year.
After having served the filter cartridge five times, or after two years at the latest, renew safety cartridge 4 (never clean it). To do this, proceed as follows:
- Undo hex, nut 5 and remove cartridge 4.
- Insert new cartridge, insert and tighten hex, nut.
Install cartridge 3, place hood 2 back in position and secure fastening clamps 1.
Attention: Never clean filter cartridge with petrol (gasoline) or hot liquids.
6.4.3 Emptying Cyclone-Type Precleaner
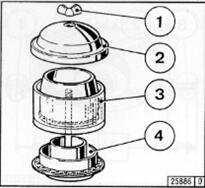
Undo wing nut 1 and remove cover 2.
Remove collector bowl 3 from lower section 4 and empty. Remove leaves, straw and other foreign matter from lower section of precleaner.
Attention: Never clean air cleaner with petrol (gasoline). Dispose of old oil in accordance with anti-pollution regulations.
6.4.4 Cleaning Oil Bath Air Cleaner
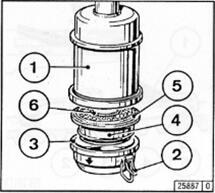
Turn engine off and wait about 10 minutes for the oil to drain from filter housing 1.
Release snap clips 2 and remove oil cup 3 together with filter element 4. If necessary, press element out with a screw driver, taking care not to damage rubber gasket 5.
Remove dirty oil and sludge. Clan oil cup.
Clean filter element 4 in diesel fuel and allow to drip-dry.
Clean filter housing 1 if very dirty.
Inspect and replace rubber gaskets 5 and if necessary.
Fill oil cup with engine oil up to he mark (arrow) (for viscosity, se 4.1.2)
Refit oil cup and element to filter housing and secure with snap clips.
6.5.1 Checking Alternator V-Belt
Inspect entire V-belt for damage
Renew damaged V-belts.
After installing new belts, run engine for 15 minutes, then check belt tension.
Tightly press the V-belt between pulleys and gauge it, the valve should not overpass 10~15mm.
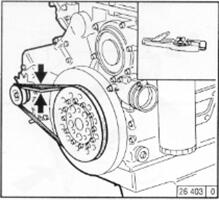
Note: Check/retension and renew V-belts only with the engine off. Refit belt guard, if provided.
6.5.2 Retensioning/Renewing Alternator V-Belt
Retensioning
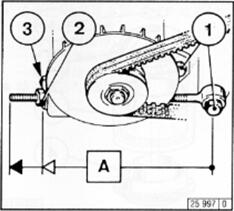
Slacken hex, bolts 1, 2 and 3.
Turn lock nut 2 in direction A until correct V-belt tension is attained.
Tighten bolts 1, 2 and 3.
Renewing
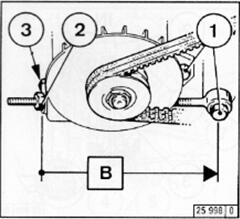
Slacken hex, bolts 1, 2 and 3.
Turn lock 2 in direction B as far as it will go.
Now the new V-belt can be easily placed in position
Tighten bolts 1,2,and 3 until correct V-belt tension is attained (see 6.5.1)
6.6.1 Checking Valve Clearance
Before adjusting valve clearance, allow engine to cool down for at least 30 minutes. The oil temperature should be below 80°C
Position crankshaft as per schematic,see 6.6.1.1
Slacken bolts 1
Remove rocker cover 2 together with gasket 3.
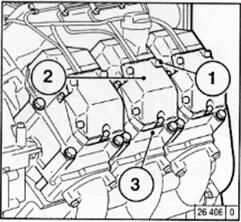
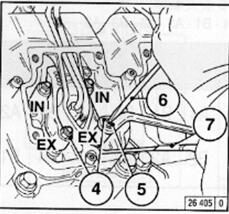
Check valve clearance 1 between rocker arm/tappet contact face 2 and valve stem 3 with feeler gauge (there should only be a slight resistance when feeler blade is inserted)
If necessary, adjust valve clearance as follows:
- Loosen lock nut 4 using wrench 7
- Adjust set screw 5 by means of screwdriver 6 in such a manner that with lock nut 4 tightened (wrench), the correct valve clearance 1 is attained.
Check the valve clearances at each of the remaining cylinders and adjust if necessary.
Refit rocker cover (together with new gasket if necessary)
6.6.2 Valve Clearance Adjustment Schematic
BF12M1015CP Firing Order: A1-B2-A5-B4-A3-B1-A6-B5-A2-B3-A4-B6
Sequence | 1 | 2 | 3 | 4 | 5 | 6 | 7 | 8 | 9 | 10 | 11 | 12 |
Valve Overlap Adjusting | A1 | B2 | A5 | B4 | A3 | B1 | A6 | B5 | A2 | B3 | A4 | B6 |
A6 | B5 | A2 | B3 | A4 | B6 | A1 | B2 | A5 | B4 | A3 | B1 |
Adjustment
Turn crankshaft according to sequence shown in the diagram (starting with cyl.1)
The valves of the relevant cylinder overlap, marked in white, (exhaust valves about to close, inlet valves about to open). Adjust clearance of valves, marked in black, according to schematic. Mark the respective rocker arm with chalk to show that the adjustment has been done.
6.7.1 Battery
6.7.1.1 Checking Battery and Cable Connections
Keep battery clean and dry
Undo soiled terminals
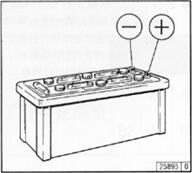
Clean battery plus and minus poles and terminals and apply a film of acid-free and acid-resistant grease.
When reconnecting, ensure good contact of terminals. Fasten clamping bolts finger tight.
6.7.1.2 Checking Electrolyte Level
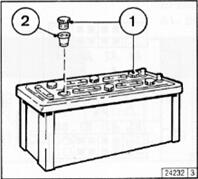
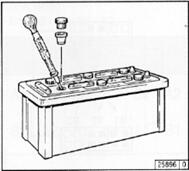
Remove cell caps 1.
If electrolyte test elements 2 are fitted: The level should be high enough to wet the bottom of these.
If no such elements are provided: Check to make sure that the level is 10-15mm above the top edge of the plates.
Top up with distilled water if necessary
Fit cell caps back in position
6.7.1.3 Checking Specific Gravity of Electrolyte
Meaure the specific gravity of the individual cells with a commercial hydrometer. The measured values (see adjacient table) indicate the satet of charge of the battery. During the measurement, the temperature of the electrolyte should preferably read 20°C.
Specific Gravity | ||
UOM kg/L | State of Charge | |
Normal | Tropics | |
1.28 | 1.23 | Fully charged |
1.20 | 1.12 | Half charged, recharge |
1.12 | 1.08 | Discharged, charge up immediately |
Attention: The gases emitted by the battery are explosive! Avoid formation of sparks in the vicinty of battery, keep away any open flames! Do not allow acid to come into contact with skin or clothing! Wear protective goggles! Do not place tools on Battery!
6.7.2 Three-Phase Alternator
Note on the three-phase system:
When the engine is running, never disconnect the cables between battery, alternator and regulator.
Where it is, however, necessary, to start and operate the engine without battery, disconnect the regulator from the alternator before starting.
Be sure not to confuse the battery terminals
Renew a defective charging pilot light bulb immediately
Engine cleaning: Do not spray with water/steam jet directly against alternator.
The habit of touching a lead against frame to check whetehr it is live must under no circumstances be applied with a three-phase electric system.
In case of electric welding, connect the earth terminal of the welding unit direct to the part to be welded.
Do not loosen connecting cable between battery and alternator during engine operation.
6.7.3 Lifting Tackle
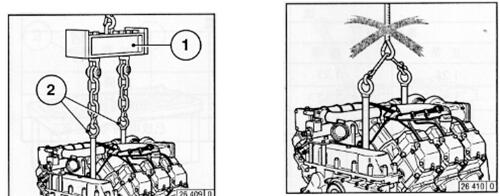
For transporting the engine, always use the proper lifting tackle.
Remove lifting tackle 2. Do not start engine with lifting tackle fitted.
More information about Deutz diesel engine, you can refer to the following articles:
Introduction to Deutz Diesel Engine BF12M1015CP
Copyright © Guangxi Dingbo Generator Set Manufacturing Co., Ltd. All Rights Reserved | Sitemap
Update cookies preferences