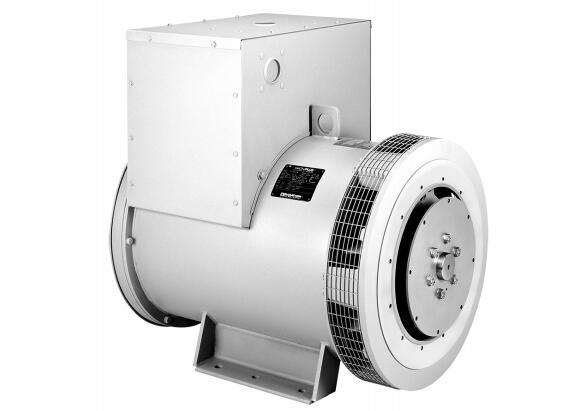
a. Generator should be installed in the dry, clean, ventilating place, and to prevent the direct contact of wind driven dirt, rain, snow and sunlight.
b. Take note of the ventilation and heating of alternator at times, and the current and voltage don't exceed the rating data.
c. The generator should not be operated at the place that full of water vapor dust and flammable gas.
d. In general, maintenance intervals will depend upon operating conditions. Routine overhaul should be made frequently.

a. Measure insulating resistance with 500V Megohm meter. If the reaidng is less than 2 MΩ, the generator should be dried. (Must disconnect AVR with generator during measuring.)
b. Replace the grease in bearing housing, and clean the surface pf two shield bearing, or replace the bearing.
c. Clean the interior of generator by blowing and take care of the all junctions.
d. Inspect all living parts, and make sure joint nut tight and contact well.
a. Take care of the disassembled parts, and avoid to bump each other or missing.
b. Should lightly place main parts such as rotor, stator, bracket, etc to prevent damage.
c. In order to reassemble easily, should make the mark for the disconnected wiring, and avoid wrong connecting.
d. Disassembled bearing and bearing cap should be covered by clean paper to prevent dirt, and replace the dirty grease.
e. After the generator reassembled, rotate the rotor slowly, ensure there are not abnormal sound and halt.
f. The bracket screws should be driven crosswise, can't drive the screws one by one.
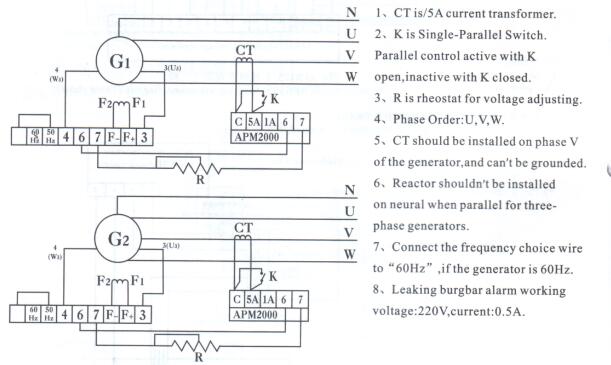
MP generator is suitable for paralleling operations as full damping winding. APM-2000 parallel mould and SE350 APR125-5 voltage regulator may be supplied for paralleling operation. If necessary, customer must take note of it in order. Consult with the factory for further information relative to parallel operation.

Solid state electronic control devices which utilize thyristor or SCR firing circuits (such as variable frequency induction motor control precision motor speed controls, no brteak powered battery charges, etc.) may introduce high frequency harmonics which adversely affect, or totally distort the normal wave form of generator. This ceates additional heat in the generator windings and may case the generator to overhaul. Problems which can occur are not limited to the generator, poor wave shape may adversely effect the thyristor devices, the equipment they power, and nay other connected load. Please contact the factory for application assistance.
AVR wiring can't be connected wrong. The terminal "3" and "4" are connected to the tap "U3" and "W3" or generator winding. It is used for 200 volt. If used for 400 volt, the AVR would be damaged.
The terminal "6" and "7" of AVR should be shorted with jumper wire. If the external potentiometer is used for remote adjusting voltage, the potentiometer would be connected to the "6" and "7". Or the AVR may be damaged without connecting.
Boost exciting must use the "12V" battery, and the alternator must be stopped. Using "24V" battery or boosting the excitation in rotating, the AVR would be damaged.
The generator runs at "50Hz" or "60Hz", should ensure the wiring right, o maybe affect AVR working.
Before shut down the generator set, first turn off the output switch, then speed down the engine.
Take care of the contact of the plug and sockets, ensure them close contacting each other.
If the generator can't built up, first of all, look for the causes, such as fuse, wirings, residue voltage, etc. Please don't adjust the potentometer and boosting excitation before known the causes.
If the engine runs at idle speed, please don't adjust the potentiometer and boost excitation.
Adjusting the voltage and stability potentiometer, please use small screw-driver and rotate slowly.
Wiring of the generator and accessories should be done in accordance with good electrical practices. Follow government, industry and association standards.
The generator conduit box construction allows cable entry from multiple sides. A hole saw or other appropriate tool may be used to provide for conduit entrance. Protect the interior of the generator from shavings when drilling or sawing. An approved connector must be used in conjunction with the conduit. To minimize the transmission of vibration, it is essential that flexible conduit be used for all electrical entrance to the generator conduit box.
Refer to the connection diagram supplied with the generator and/or the proper diagrams shown in this manual. Install all inter-component and external wiring in accordance with national and local electrical codes. The neutral in the following connection diagrams shown below may be either grounded (earthed) or left above ground potential (floating). See national and local codes and/or the system distribution wiring schematic diagram for the proper connection of the neutral.
The following connection diagrams are shown for twelve lead generators. Ten lead generators have connected inside the generator and brought out as a single lead (TO). Ten lead generators can only be connected in a wire configuration.
The rectifier assembly cannot be removed until the opposite drive and bearing bracket and bearing have been removed (see bearing removal procedure). Remove the three exciter rotor leads from the heat sinks and the two main rotor leads from the main rotor posts (see figure 7). Remove the screws securing the rectifier assembly and pull the assembly free from the shaft.
If the alternator is close coupled to an engine. It may be necessary to " bar over" the engine in order to gain access to a given area of the rectifier assembly. Never used the generator's fas as a fulcrum to accomplish this. Use the engine manufacturer's recommended practice to manually turn over the engine. To prevent possiblt inquiry to personnel, and damage to the equipment, ensure that the engine cannot start during this procedure.
Remove the two main rotor leads and the three exciter rotor leads from the rectifier assembly (figure 7). The rectifier assembly is now electrically isolated from the generator. the diodes remain mounted and the diode leads remain connected to the terminal post. In succession, touch the other test probe to the lead screw hole in each heat sink. Reverse the probes and repeat the procedure. You have now tested the three diodes connected to this terminal post in both the forward and reverse direction. Repeat the procedure suing the other diode terminal post.
When the positive test probe is connected to the diode's anode and negative test probe is connected to the diode's cathode (forward biased), the diode will switch on and conduit electricity (figure 6). This is observed by a low resistance reading when using an ohm meter or the lighting of the bulb when using a battery light continuity tester. Reversing the test leads (reverse biased) will result in the diode switching off and no electricity will be conducted. The results of these tests should indicate one of three conditions.
Good diode: Will have a much greater resistance in one direction than the other. typical reverse biased resistance will be 30,000 ohms or greater, while forward biased resistance will be less than 10 ohms. The battery-light tester will have the light "on" in one direction and "off" in the other.
Shorted condition: Ohmmeter reading will be zero, or very low in both directions. The continuity tester will have the light "on" in both direction.
Open condition: Ohmmeter will have a maximum (infinity) reading in both directions. Continuity tester light will be off in both directions.
Diode failure after a 25 hour "run-in" period is generally traceable to external causes such as a lighting strike, reverse current, line voltage spikes, etc. All 6 diodes are essentially in the same circuit. When a diode is stressed to failure, there is no easy method to determine remaining life in the other diodes. To avoid possible continued failure, it is recommended that the entire rectifier assembly be replaced rather than replacing individual diodes.
Copyright © Guangxi Dingbo Generator Set Manufacturing Co., Ltd. All Rights Reserved | Sitemap
Update cookies preferences