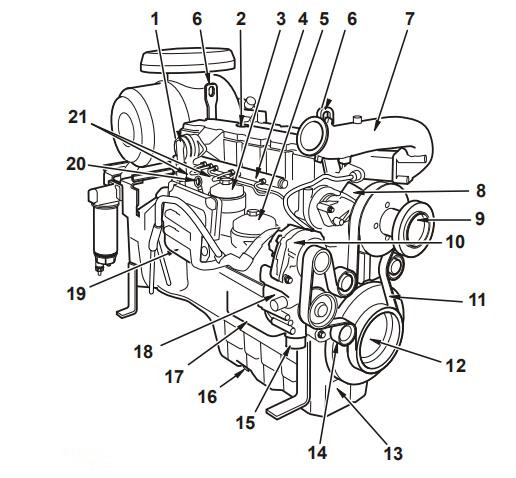
1. Crankcase ventilation, (sealed crankcase, ventilation optional)
2. Oil filler
3. Fuel filter
4. Common Rail unit, with safety valve and rail pressure sensor
5. Oil filter
6. Lifting eyes, (2 pcs)
7. Inlet, after charge-air cooler
8. Coolant outlet, from thermostat housing
9. Fan hub
10. Alternator
11. Drive belt
12. Drive gear, crankshaft
13. Oil pan
14. Tensioner pulley
15. Coolant inlet, to engine
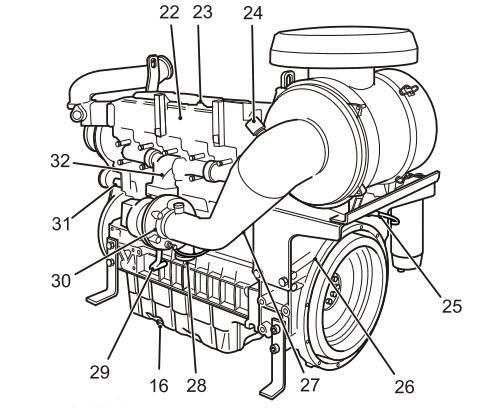
16. Drain plug, oil pan
17. Oil cooler
18. Coolant pump
19. Outlet (option)
20. Oil dipstick
21. High pressure pumps
22. Intake manifold
23. Valve cover
24. Indicator, air filter
25 Fuel pump
26. Flywheel housing
27. Starter motor guard
28. Charge air, to cooler
29. 011 pipe, from turbo
30. Turbo
31. Relay
32 Exhaust manifold
Engine, General
General inspection
Make it a habit to give the engine and engine compartment a visual inspection before starting the engine and after operation once the engine has stopped. This will help you to discover quickly if anything abnormal has happened, or is about to happen.
Look especially carefully at oil, fuel and coolant leakage, loose bolts, worn or poorly tensioned drive belts, loose connections, damaged hoses and electrical cables. This inspection only takes a few minutes and can prevent serious malfunctions and expensive repairs.
WARNING
Accumulations of fuel, oil and grease on the engine or in the engine room constitute a fire hazard and must be removed as soon as they are detected.
WARNING
If an oil, fuel or coolant leak is detected, the cause must be investigated and the fault rectified before the engine is started.
WARNING
Washing with a power washer: Never aim the water jet at radiators, charge air cooler, seals, rubber hoses or electrical components.
Drive Belt, Check and Change
IMPORTANT!
Always change a belt which is oily, worn or damaged. Belts which operate in pairs must be changed together.
Inspection should be carried out after operation, when the belt is hot. It should be possible to depress the drive belt about 3-4 mm (0.12-0.16") between the pulleys.
The drive belt has an automatic belt tensioner and therefore does not need to be adjusted.
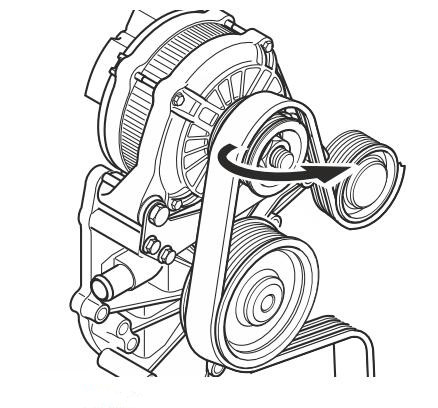
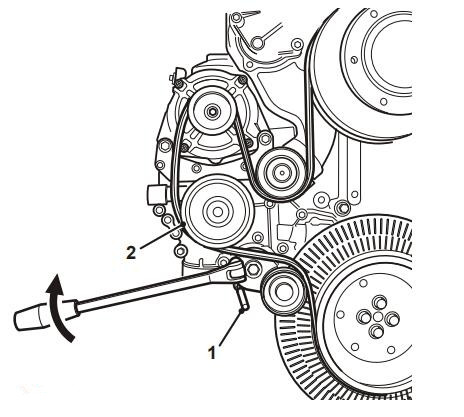
1. Release the belt tensioner and lock it in place with a drift (1 ).
2. Remove the belt from the coolant pump (2) first. Install the new belt.
Remove the belt tensioner and the drift (1). Check that the belts are correctly aligned in their grooves and are correctly tensioned.
Oil level, checking and topping up
WARNINGI
Working with or approaching a running engine is a safety risk. Watch out for rotating components and hot surfaces.
When checking the oil level the vehicle should stand on level ground.
Only use a recommended grade of oil; refer to Oil recommendations.
Make sure that the oil level is between the MIN and MAX marks. Do not fill above the maximum oil level.
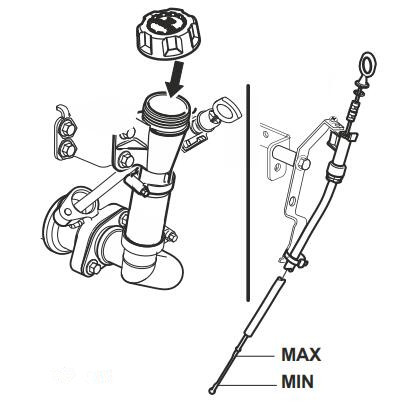
Oil filter, Change
Change the oil filters during each oil change.
WARNING
Hot oil and hot surfaces can cause burns.
Removal
1. Drain the oil according to the instructions in Engine 0,7, Change, page 48.
NOTICE! Position a suitable vessel underneath the filter to avoid oil spillage.
2. Clean around the oil filter.
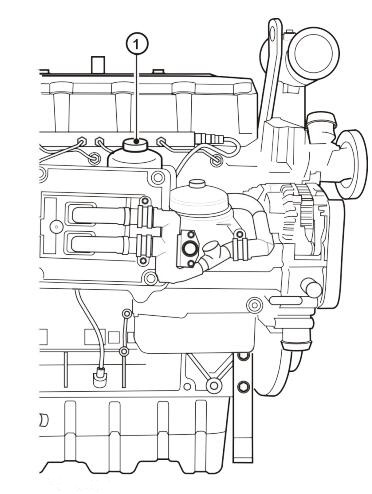
3. Carefully remove the oil filter cover (1) and filter
4. Remove the O-ring (2) and filter (3)
5. Let the oil drip off into a collection vessel.
Installation
6. Install a new filter (3) and a new O-ring (2)
7. Install the filter cover (1) and filter Torque to: 40 Nm (29.5 lbf.ft.)
8. Fill with required volume of oil, see Engine Oil, Change, page 48. Carry out a function test
Start the engine.
Check that there is no oil leakage from the oil filter or drain nipple.
Turn off the engine.
Check the oil level after a few minutes.
Top up with oil as necessary.
Draining condensate, fuel system
1. Stop the engine and close the fuel tap.
2. Put a collection vessel under the fuel pre-filter to collect the condensate and fuel.
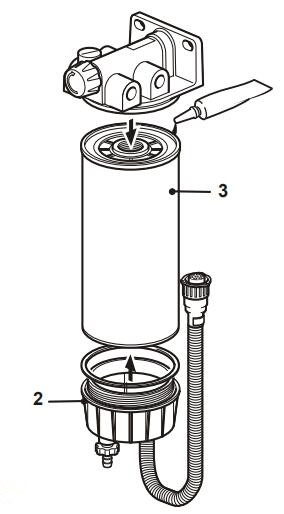
3. Open the drain nipple (1) at the bottom of the water separator (2).
4. Drain the water contained in the water separator into the collection vessel.
NOTICE! Do not drain the water separator completely.
5. Tighten the drain nipple and open the fuel tap.
6. Start the engine and check there is no fuel leakage from water separator.
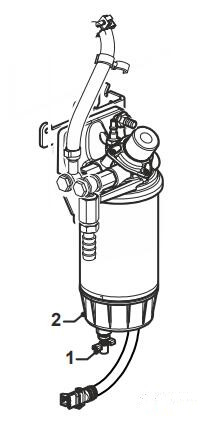
Fuel filter, Change
WARNING
Risk of fire.
When carrying out work on the fuel system make sure the engine is cold. A fuel spill onto a hot surface or electrical components can cause a fire.
NOTICE! Do not fill the new fuel filter with fuel before assembly; there is a risk of contaminants entering the system and causing malfunctions or damage.
1. Clean round the fuel filter
2. Remove the filter (1) using a suitable filter remover. Collect any spilled fuel in a collection vessel.
3. Clean the filter mating surface on the filter bracket
4. Lubricate the seal with diesel and install the new fuel filter. Tighten the fuel filter in accordance with the instructions on the fuel filter.
5. Vent the fuel system as necessary; refer to Fuel system, bleeding.
Fuel Pre-filter, Change
Removal
1. Clean around the pre-filter and the water separator. Open the drain nipple (1) in the base of the water separator.
2. Tighten the drain nipple (1).
Remove the lower part of the water separator (2)
Remove the pre-filter (3); use a filter wrench.
3. Clean the mating surfaces
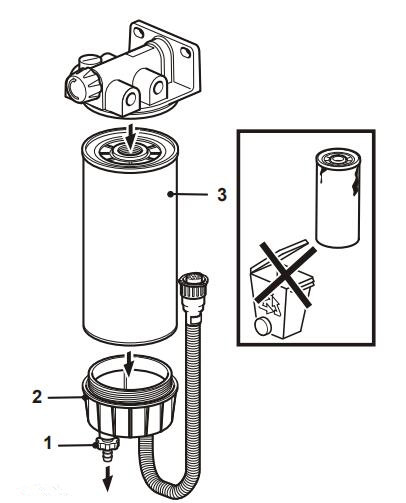
Installation
4. Grease the gasket surfaces.
Fit the new pre-filter (3).
Tighten according to the instructions on the filter
5. Install the lower part of the water separator (2)
NOTICE! Use a new seal ring
6. Open the fuel taps and purge the fuel system refer to Fuel system, bleeding.
7. Start the engine and check for leaks.
Coolant, Draining
Before draining, stop the engine and unscrew the filler cap.
WARNING
Do not open the coolant filler cap when the engine is hot, except in emergencies as this could cause serious personal injury. Steam or hot fluid could spray out.
WARNING
All coolant is hazardous and harmful to the environment. Do not consume. Coolant is flammable.
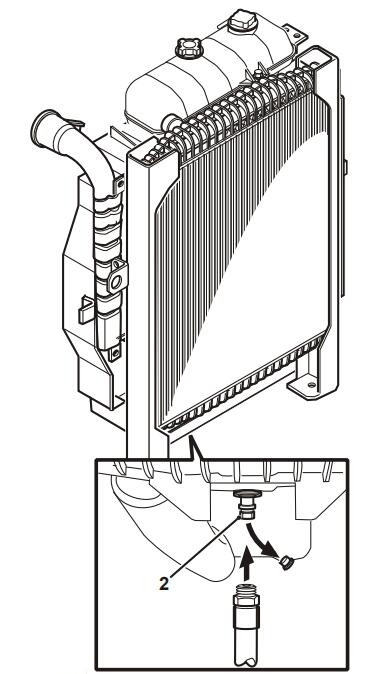
There is a drain plug (1) in the engine block, and a drain nipple (2) under the radiator for draining coolant.
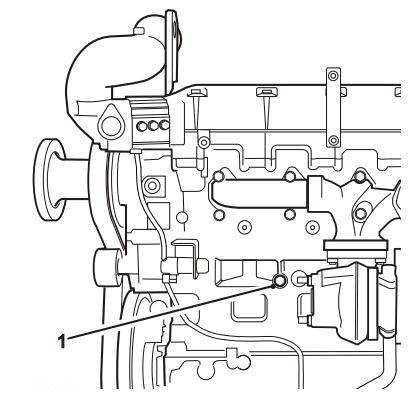
1. Put a suitable vessel underneath the drain plug (1) and undo the plug.
Then put a suitable vessel underneath the radiator and remove the protective cap from drain nipple (2). Connect a suitable hose and drain off the coolant.
2. Let the coolant run out
NOTICE! There may be deposits inside the drain plugs/taps; the deposits must be cleaned away. Check that all coolant has indeed drained out.
3. Screw the drain plug (1) back.
Remove the hose from the drain nipple (2) and put its protective cap back on.
Charge Air Cooler, External Cleaning
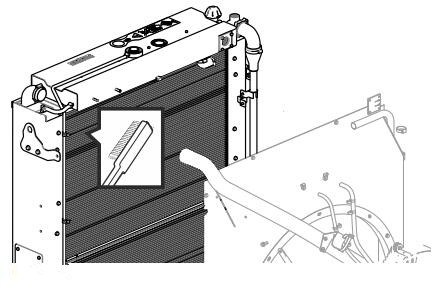
Do not use a high pressure power washer
Remove guards as necessary, to access the radiator. Clean with water and a mild detergent. Use a soft brush. Be careful not to damage the radiator vanes. Reinstall removed parts.
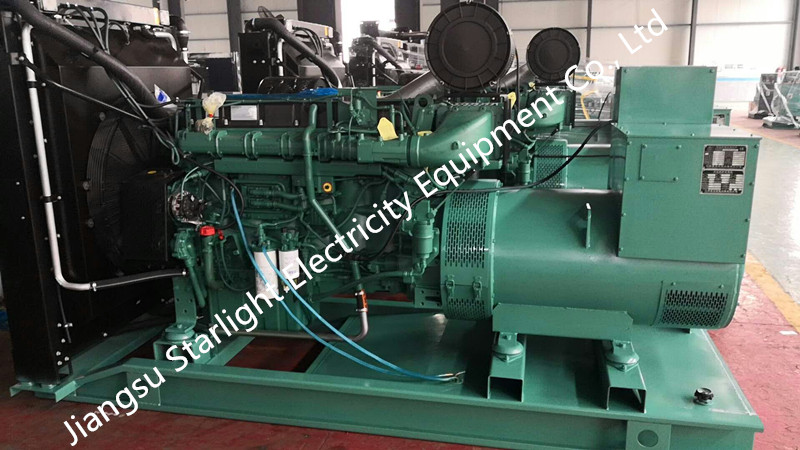
Starlight Volvo Series Diesel Genset Features:
* Powerful load-bearing capacity
* Smooth running, low noise
* Fast and reliable cold start performance
* Exquisite and small shape design
* Low fuel consumption and low operating cost
* Low exhaust emissions, economic and environmental protection
* Service network all over the world plenty of spare parts supply.
Copyright © Guangxi Dingbo Generator Set Manufacturing Co., Ltd. All Rights Reserved | Sitemap
Update cookies preferences