Regular maintenance is important to prolong the service life of genset. This article will guide you to learn Shangchai engine maintenance plan.
5. Engine Maintenance
5.1 Maintenance Plan
The following table gives maintenance period and tasks. Make regular maintenance based on this table. If the engine frequently operates at the ambient temperature below -18℃ or above 38℃, or in dusty environment, the maintenance period should be shortened properly.
Maintenance tasks | First maintenance 80-100 hours | Daily | Every 250 h or 3 months | Every 500 h or 6 months | Every 1,000 h or 12 months | Every 2,000 h or 2 years |
Checking engine periphery | ● | ● | ● | ● | ● | ● |
Checking fuel tank | ● | ● | ● | ● | ● | ● |
Checking the air filter | ● | ● | ● | ● | ● | ● |
Checking oil level in engine | ● | ● | ● | ● | ● | ● |
Checking oil level in fuel pump | ● | ● | ● | ● | ● | ● |
Checking coolant level | ● | ● | ● | ● | ● | ● |
Checking electrolyte level | ● | ● | ● | ● | ● | ● |
Checking drive belt | ● | ● | ● | ● | ● | ● |
Checking cooling fan | ● | |||||
Checking fan and drive belts tension | ● | ● | ● | ● | ||
Checking engine oil and oil filter | ● | ● | ● | ● | ● | |
Checking fuel filter | ● | ● | ● | ● | ||
Checking fuel system | ● | ● | ● | ● | ||
Checking intake system | ● | ● | ● | ● | ||
Checking and adjusting valve clearance | ● | ● | ● | ● | ||
Checking grease | ● | ● | ● | |||
Checking fuel pump coupling | ● | ● | ● | ● | ||
Changing oil in fuel pump | ● | ● | ● | |||
Checking fuel injector | ● | ● | ● | |||
Checking intercooler and its line | ● | ● | ● | |||
Cleaning primary fuel filter (on marine) | ● | ● | ● | |||
Calibrating instrument | ● | ● | ||||
Checking fan bearing | ● | |||||
Checking turbocharger | ● | |||||
Checking vibration damper | ● | |||||
Changing coolant and cleaning cooling system | ● | |||||
※ The belt must be replaced when it has crack or defect(s) that affects its use. Note: 1) It is required top crack the crankshaft several turns when the engine is first put into use or is out of service for a quite long time. 2) The maintenance interval in this table is in hours, months, or years whichever comes first. | ||||||
5.3 Tasks and Methods of Engine Maintenance
5.3.1 Checking engine periphery
Check the periphery of the engine each time before staring:
● Check if the engine is in clean state and free from useless things on it.
● Check the joints and connections of the fuel system, cooling system and lubricating system for leakage.
● Check if the fan and its safety guard are fastened in place.
● Check the fastening condition accessories.
●Check the electrical circuits and the wire for intact.
●Check the drive belt for intact.
5-3.2 Checking fuel tank
Check the fuel level in the fuel tank daily.
5.3.3 Checking the air filter
Check the air filter every day. Check the engine performance for deterioration, especially, in windy and or sandy areas. If there is black smoke in the exhaust or a drop in the power after the engine running for some time, check the air filter cartridge for clogging first (of course, check the nozzle spray, the fuel-supply advance angle and other as well). If the air filter is clogged, do not dean the filter cartridge with oil, water and other liquids, Be sure to Shut the engine down immediately and then replace the air filter cartridge.
For requirements and procedures of replacement of filter are cartridge, see Paragraph 5.3.27.
Caution: Be sure that both end faces of the air filter are reliably sealed without leakage after the air fitter element has been changed.
Caution: Do not shut the engine without an air filter, and failure to do so would easily cause early engine. Marine application is exceptional.
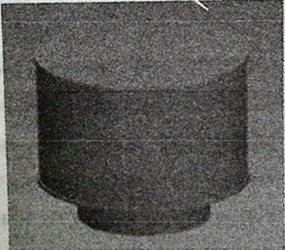
5.3,4 Checking oil level
Check the oil level daily before starting the engine or the engine is in stop (at least 15 minutes after the engine has stopped to provide enough time for oil to flow back to the oil pan). The oil level should be between the upper mark (FULL) and the lower mark (ADD). If oil is not enough, Supplement it to near the high level mark.
Caution: Do not run the engine when the oil level is below the lower mark (ADD), otherwise it can result in poor engine performance, or even damage to the engine. But the oil level should not exceed the high level mark.

5.3.5 Checking oil level in fuel pump
Check the oil level in the fuel pump daily before starting the engine or the engine is in stop (at least 15 minutes after the engine has stopped to provide enough time for oil to flow back to the governor).
The oil dipstick is an the electric governor and it is made with filler cap in one piece.
(1) Loosen the oil dipstick and check the oil level. Add oil to near the upper mark (high level) if needed.
Caution: It takes longer time to add on to the fuel pump because oil gets in the fuel pump from the governor through the bearing clearance.
(2) Tighten the oil dipstick with hand to a proper degree.
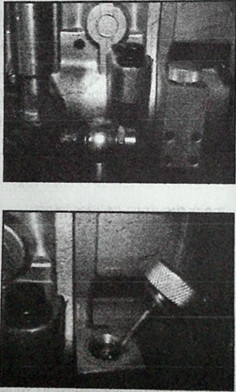
5.3.6 Checking coolant level
Check the coolant level daily before starting the engine or after the engine has been stopped.
Warning: At operating temperature, engine coolant is hot and under pressure and the coolant steam can cause personal injury. Do not remover the pressure cap on the radiator until the engine stops and the coolant temperature drops to below 50°C. Slowly loosen the cap to release the cooling system pressure before checking the coolant level or making supplement.
Warning: Avoid skin or eye contact with coolant to prevent personal injury because the coolant contains alkali.
(1) Slowly loosen the pressure cap on the radiator to release pressure before starting the engine or after the engine has stopped and the coolant temperature has gone below 50°C.
(2) Remove the pressure cap and check coolant level from the filler or Inspection port The coolant level should remain between the marks in the radiator or expansion tank, or meet the requirement of the equipment manufacturer.
(3) Add if necessary. Coolant should be added near the upper mark or meet the requirement of the equipment manufacturer.
Caution: Coolant should be added slowly to avoid air block.
5.3.7 Checking electrolyte level
Some batteries are free from maintenance. Pay attention to its lifetime and change it when the lifetime is due. Refer to the instruction on the battery for the lifetime. Some batteries need maintenance (adding special liquid or distilled water).
(1) Check the electrolyte level before starting the engine. Remove the filler cap and check the electrolyte level. It should be at the bottom of the filler port. If necessary, make supplement as per requirement.
Caution: Never pure drinking water for battery, because pure water contains many micro element that will do harm to battery.

5.3.8 Checking drive belt
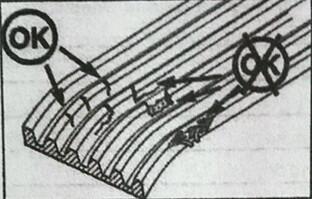
Perform visual check on the drive belt everyday for any intersecting cracks. Transverse cracks along the width direction the belt are acceptable, while longitudinal cracks (along the length direction) that intersect with transverse cracks are not allowed. If any wear or abrasion occurs, replace it.
5.3.9 Checking cooling fan
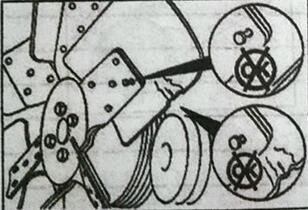
Perform visual check on the cooling tan for crack, loose rivet or blade bent or any other defect. The fan should be installed reliably. Tighten the fastening bolts or replace the damaged fan if necessary.
Warning: Damaged fan blades can cause serious personal injury. Do not pull or pry the fan, and do not rotate the engine with the fan.
5.3.10 Checking fan and drive belts tension
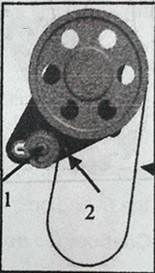
Fan belt tension
Check: Apply a force of about 98 N on the middle point (see the arrow) of the belt span between the two pulleys with finger by pressing, and check the position change of that point. The change should be within 12-15 mm. If it is out of the range, make adjustment.
Adjustment: Unscrew the bolt (1) of the tension-er and loosen the bolt (2). Change the position of the tension-er to adjust the belt tension. Tighten the bolt (2) to 95 Nm, then tighten the bolt (1) to 13715 Nm.
Drive belt tension
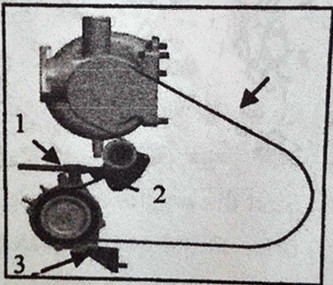
Check: Apply a force of about 98 N on the middle point (See the arrow) or the belt span between the two pulleys with finger by pressing and check the position change of that point. The change should be within 10- 12 mm. If it is out of the range, make adjustment.
Adjustment: Unscrew the nut (3) to loose the alternator. Unscrew the nut (1), tighten nut (2) to change the position of the alternator to increase the belt tension. and then tighten the nuts l to 80 N-m. Tighten the nut {3) to 45 N-m.
Maybe you also like:
Shangchai W Series Engine Operating Tips
Copyright © Guangxi Dingbo Generator Set Manufacturing Co., Ltd. All Rights Reserved | Sitemap
Update cookies preferences