Fuel system, bleeding
TAD752GE, TAD753GE, TAD754GE
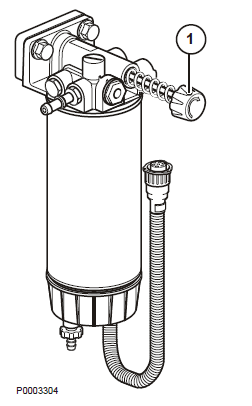
1 Open the hand pump (1), by pressing it in and turning it counter-clockwise.
2 Purge the fuel system by pumping at least 250 strokes on the hand pump. Pump rapidly, to maintain pressure in the pump.
NOTICE! Purging is not complete while resistance is felt in the pump.
3 Close the hand pump (1) by pressing it in and turning it clockwise.
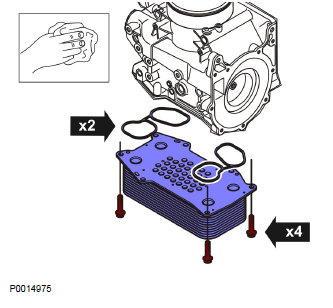
4 Start the Volvo engine and let it idle for at least 5 minutes, before speed is increased.
Draining, Fuel Duct in Cylinder Head
TAD752GE, TAD753GE, TAD754GE
NOTICE! Be prepared to gather up fluids.
1 Clean the fuel connection.
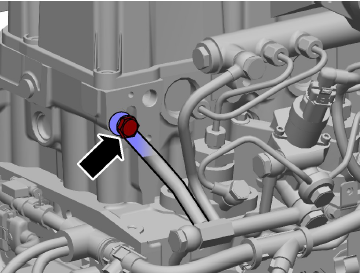
2 Remove the hollow screw from the return line on the cylinder head.
3 When replacing injectors, refer to Injector, Change page 123.
Fuel Pre-filter, Change
TAD752GE, TAD753GE, TAD754GE
Tools:
9999179 Extractor oil filter
Removal
IMPORTANT!
Work on the fuel system demands exceptional cleanliness.
NOTICE! Be prepared to gather up fluids.
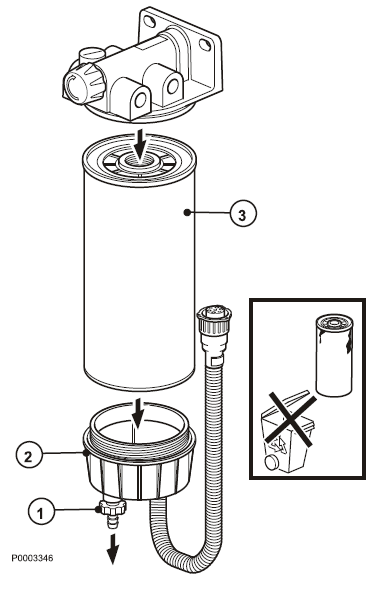
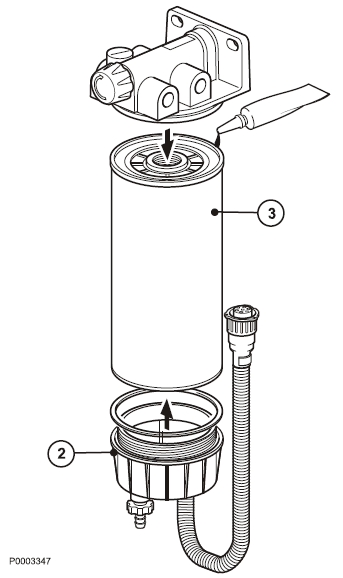
1 Open the drain nipple in the base of the water separator (1).
2 Tighten the drain nipple (1).
3 Remove the lower part of the water separator (2).
4 Remove the pre-filter (3); use 9999179 Extractor oil filter.
Installation
NOTICE! Use new components.
5 Grease the gasket surfaces.
6 Install the prefilter (3).
7 Tighten according to the instructions on the filter.
8 Install the lower part of the water separator (2).
9 Carry out a function check.
Fuel filter, Change
TAD550GE, TAD551GE, TAD750GE, TAD751GE
Tools:
9999179 Extractor oil filter
Removal
NOTICE! Be prepared to gather up fluids.
1 Clean around the fuel filter.
2 Close the cock on the return line to the tank. Disconnect the quick connector on the return line.
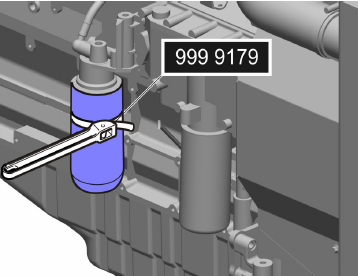
3 Remove the fuel filter.
Installation
4 Lightly oil the fuel filter gasket. Tighten the fuel filter by hand until it touches the contact surface. Then tighten an additional half turn, no more.
5 Reconnect the quick connector on the return line. Open the cock on the return line to the tank.
6 Vent the fuel system; refer to Fuel system, bleeding page 104.
7 Warm up the engine and perform a function check with regard to any leakages.
Fuel filter, Change
TAD752GE, TAD753GE, TAD754GE
Removal
1 Clean around the fuel filter. If the fuel tank has a "low" location:
NOTICE! The filter is self-draining (if the fuel tank is located under the engine); wait a couple of seconds before removing the filter cover and filter. If the fuel tank has a "high" location:
NOTICE! Be prepared to gather up fluids.
2 Close the cock on the return line to the tank. Disconnect the quick connector on the return line.
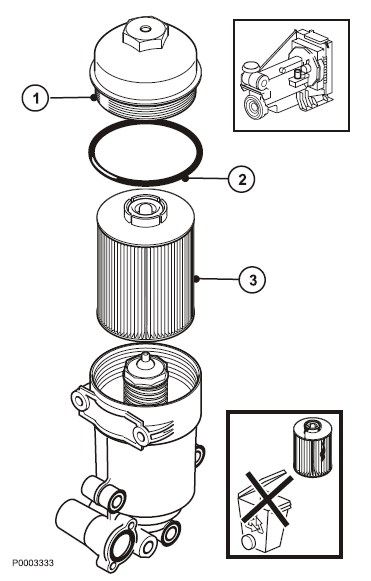
3 Remove the filter cover (1).
4 Remove the O-ring (2) and filter (3).
Installation
5 Install a new filter (3) and a new O-ring (2).
6 Install the filter cover (1) and filter. Tightening torque: 40 Nm (29.5 lbf. ft.) If the fuel tank has a "high" location: Reconnect the quick connector on the return line. Open the cock on the return line to the tank.
7 Vent the fuel system; refer to Fuel system, bleeding page 104.
8 Warm up the engine and perform a function check nwith regard to any leakages.
Fuel filter housing, change
TAD752GE, TAD753GE, TAD754GE
Tools:
885510 Plugs
Removal
IMPORTANT!
Work on the fuel system demands exceptional cleanliness.
IMPORTANT!
Install protective plugs in open connections. Close the cock on the return line to the tank.
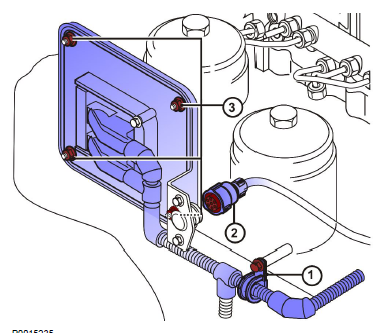
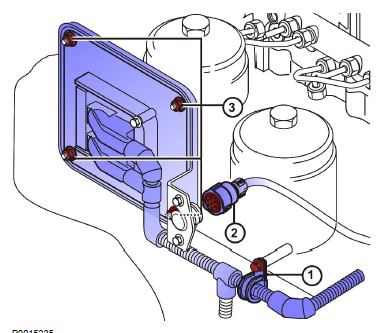
1 Remove the clamp (1).
2 Disconnect the connector from the stop button(2).
3 Remove the engine control unit (3); refer to Engine Control Unit (ECU), Replace page 212.
4 Remove the engine control unit holder.
5 Remove the electrical connection (1) from the fuel pressure sensor.
NOTICE! Be prepared to gather up fluids.
6 Undo the feed line (1) from the control valve.
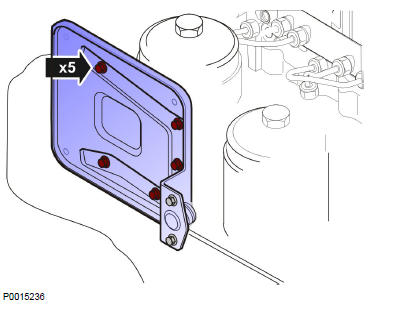
NOTICE! Be prepared to gather up fluids.
7 Plug connections to exclude dirt (885510 Plugs).
8 Remove the feed line (1) from the fuel filter bracket.
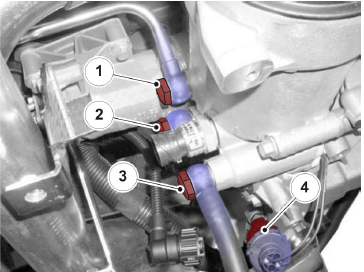
9 Remove the quick connectors from the fuel return; alternatively remove the hollow screw (2) from the return line.
10 Remove the hollow screw (3) from the fuel inlet line
11 Remove the harness terminal, preheater (option, 4).
NOTICE! Be prepared to gather up fluids.
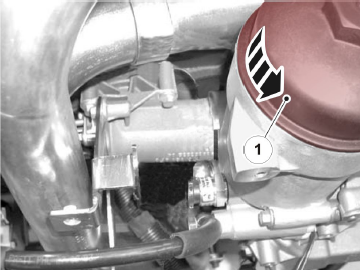
12 Remove the filter cover (1); refer to Fuel filter, Change page 108.
13 Remove the fuel filter bracket.
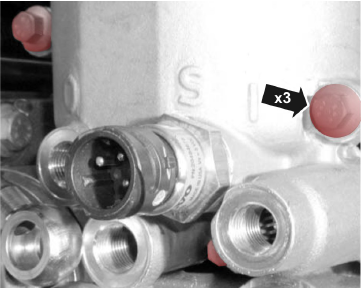
Installation
14 Install the fuel filter bracket on the oil filter housing. Tightening torque: 30 Nm (22.1 lbf.ft.)
15 Tighten the filter cover (1) with a new O-ring; refer to Fuel filter, Change page 108. Tightening torque: 40 Nm (29.5 lbf.ft.)
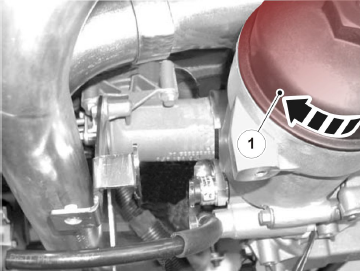
NOTICE! Use new seals.
16 Install the feed line (1) to the fuel filter bracket. Tightening torque: 39 Nm (28.8 lbf.ft.)
17 Install the quick connectors for the fuel return, alternatively install the banjo connection hollow screw (2). Tightening torque: 49 Nm (36.1 lbf.ft.)
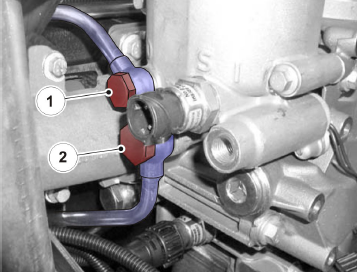
18 Connect the feed line (1) to the control valve. Tightening torque: 39 Nm (28.8 lbf.ft.)
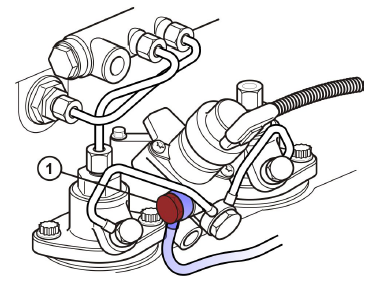
19 Fit the electrical connection to the fuel pressure sensor.
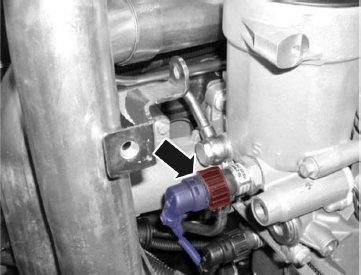
20 Install the hollow screw (3) in the fuel inlet line Tightening torque: 39 Nm (28.8 lbf.ft.)
21 Connect the harness terminal, preheater (option,4).
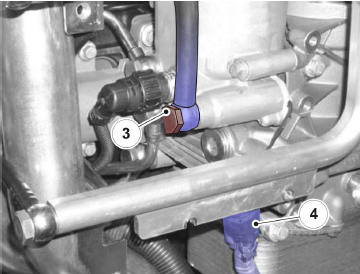
22 Install the holder for the engine control unit. Tightening torque: 20 Nm (14.8 lbf.ft.)
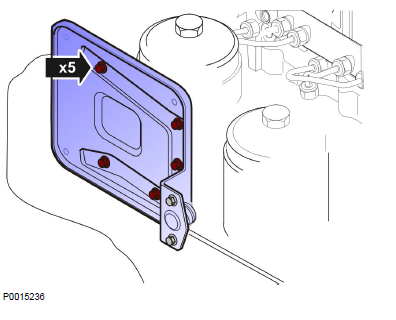
23 Install the engine control unit (3); refer to Engine Control Unit (ECU), Replace page 212.
24 Connect the harness terminal to the stop button (2).
25 Install the engine control unit wire harness clamp (1).
26 Open the cock on the return line to the tank.
27 Vent the fuel system; refer to Fuel system, bleeding page 104.
High Pressure Pump, Change
TAD752GE, TAD753GE, TAD754GE
Tools:
885510 Plugs
9991821 Extractor
88800014 Rotation tool
88800070 Wrench
IMPORTANT!
Work on the fuel system demands exceptional cleanliness.
IMPORTANT!
Clean thoroughly before dismantling.
Removal
1 Remove the oil trap.
2 Remove the plug from the flywheel.
3 Install 88800014 Rotation tool.
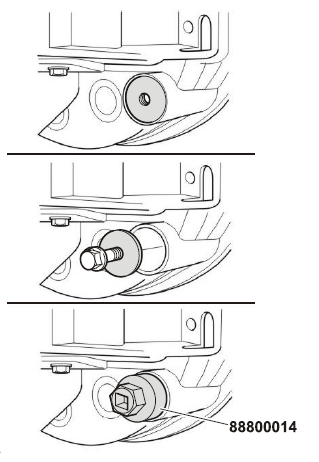
NOTICE! Be prepared to gather up fluids.
4 Remove the fuel pump connections (4 pcs).
5 Remove the fuel delivery pipes; use 88800070 Wrench.
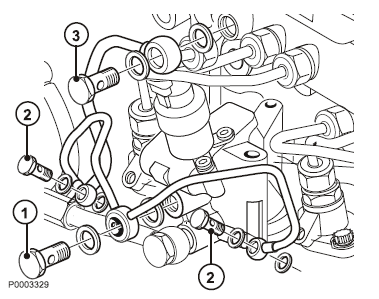
6 IMPORTANT!
Install protective plugs in open connections. Use 885510 Plugs.
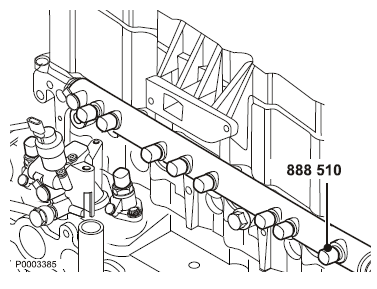
NOTICE! Turn the crankshaft until fuel flows from the pump that is not to be removed. The fuel pump that is to be removed is then not under load.
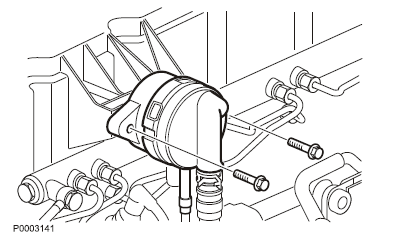
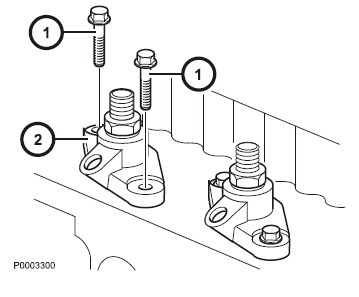
7 Undo bolts (1) alternately and remove the fuel pump (2).
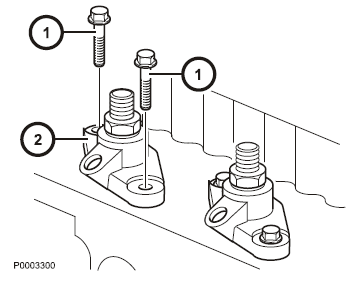
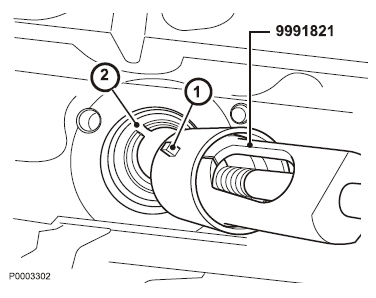
NOTICE! Pay attention to the key (1) and keyway (2).
8 Remove the fuel pump roller cam. Use 9991821 Extractor.
Installation
9 Check that there is no damage to the lobe/cam.
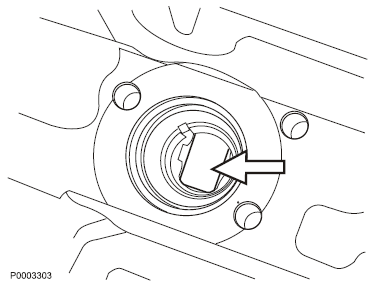
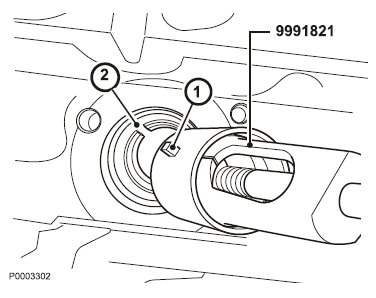
NOTICE! Align the key (1) with the keyway (2).
10 Brush a thin coating of oil around the roller cam. Install it. Use 9991821 Extractor.
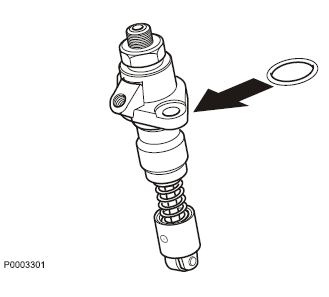
11 Install a new O-ring on the fuel pump.
12 Install the fuel pump (2).
Tighten the bolts (1) alternately.
Tighten in two steps:
Step 1: 10 Nm (7.4 lbf. ft.)
Step 2: 50 Nm (36.9 lbf. ft.)
If the other pump has been removed:
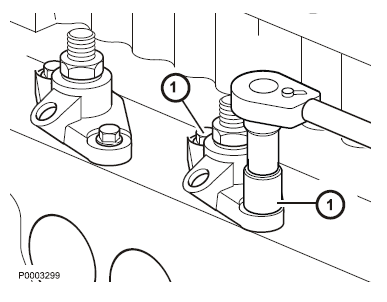
Crank the engine crankshaft so that the roller cam arrives at the lowest position.
Tighten the bolts (1) alternately.
Tighten in two steps:
Step 1: 10 Nm (7.4 lbf. ft.)
Step 2: 50 Nm (36.9 lbf. ft.)
NOTICE! Use a new component.
13 Install new copper washers to the banjo bolt (1). Tightening torque: 34 Nm (25.1 lbf. ft.)
14 Install new copper washers to the banjo bolts (2). Tightening torque: 26 Nm (19.2 lbf. ft.)
15 Install new fuel delivery pipes 88800070 Wrench. Tightening torque: 25 Nm (18.4 lbf. ft.)
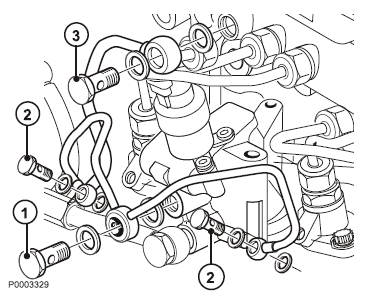
16 Install the fuel return line with new copper washers (3). Tightening torque: 39 Nm (28.8 lbf. ft.)
17 Install the oil trap.
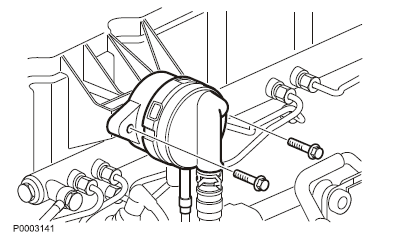
18 Remove 88800014 Rotation tool.
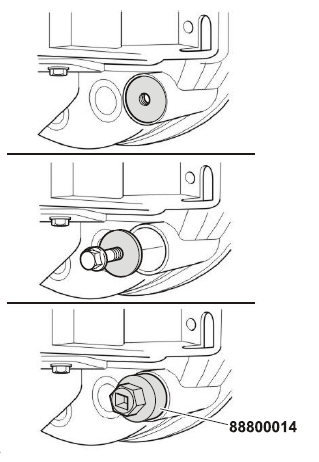
19 Replace the plug in the flywheel.
20 Vent the fuel system; refer to Fuel system, bleeding page 104.
21 Perform a function check in respect of any leakages.
Copyright © Guangxi Dingbo Generator Set Manufacturing Co., Ltd. All Rights Reserved | Sitemap
Update cookies preferences