Coolant Pump, Change
TAD550GE, TAD551GE, TAD750GE, TAD751GE
Removal
1 Cooling system drained; refer to Coolant, Change page 187.
2 Remove the fan cowls; refer to 26-3, Fan, change.
3 Remove the fan; refer to 26-3, Fan, change.
4 Remove the fuel pump and coolant pump drive belt; refer to Drive Belt, Change page 204.
5 Remove the thermostat housing according to 26-2, Thermostat Housing, Change.
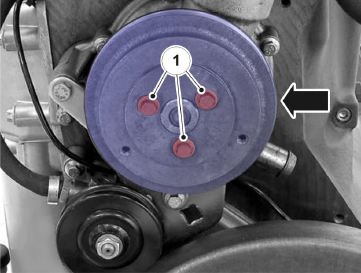
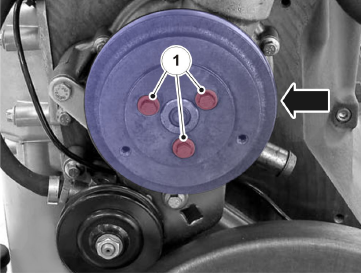
6 Unbolt (1) the pulley.
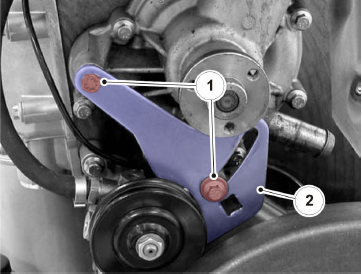
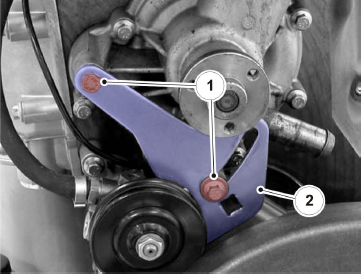
7 Unbolt (1) the bracket (2), release, move aside and secure the fuel pump.
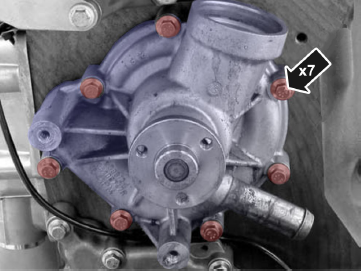
8 Remove the coolant pump with gasket.
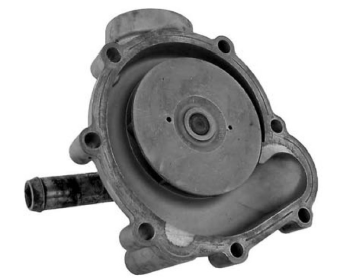
9 Clean and inspect the sealing surfaces.
Installation
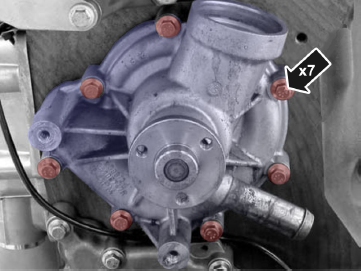
10 Install the coolant pump with a new gasket.
Tightening sequence: Diagonal
Tightening torque: 30 Nm (22.1 lbf. ft.)
11 Install the thermostat housing according to 26-2, Thermostat Housing, Change.
12 Install the fuel pump with bracket (2), insert bolts (1) without tightening.
13 Install (1) the pulley.
14 Install the fuel pump and coolant pump drive belt; refer to Drive Belt, Change page 204.
15 Install the cooling fan; refer to 26-3, Fan, change.
16 Install the fan cowls; refer to 26-3, Fan, change.
17 Fill with coolant according to Coolant Level, Checking and Topping Up page 185.
18 Check for leaks; check function.
Coolant Pump, Change
TAD752GE, TAD753GE, TAD754GE
Removal
1 Cooling system drained; refer to Coolant, Change page 187.
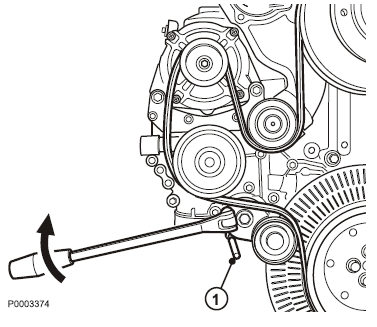
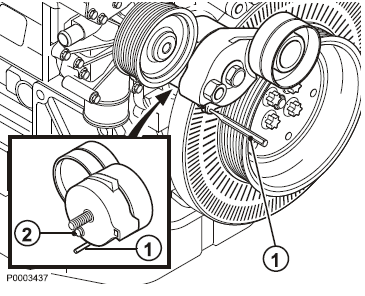
2 Release the belt tensioner and lock it in place with a drift (1).
3 Remove the drive belt.
4 Remove the two radiator hose clamps (1, 2) from the coolant pump and bend the hoses away to one side.
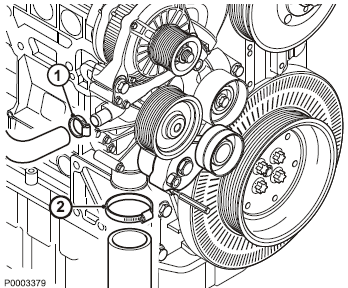
5 Remove the alternator cable and connector.
6 Remove the alternator (1).
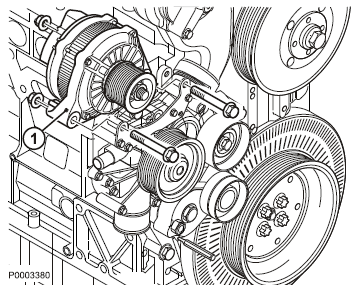
7 Remove the belt tensioner, with drift (1).
8 Remove the idler wheel (by the alternator).
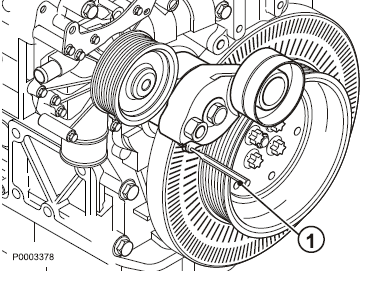
9 Remove the coolant pump. Turn the pump clockwise a little to release it from the thermostat housing.
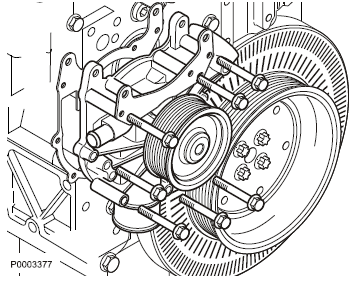
10 If necessary, tap carefully with a rubber mallet.
11 Transfer any necessary components from the old pump.
Installation
12 Install the coolant pump; first guide in the coolant pump "neck" and O-rings. Tightening torque: 30 Nm (22.1 lbf. ft.)
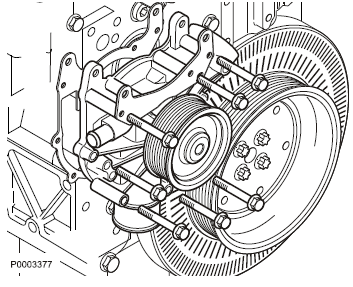
13 Install the alternator idler wheel.
14 Install the belt tensioner using drift (1).
NOTICE! Align the belt tensioner guide pin (2).
15 Install the alternator and tighten the bolts (1). Tightening torque: 30 Nm (22.1 lbf. ft.)
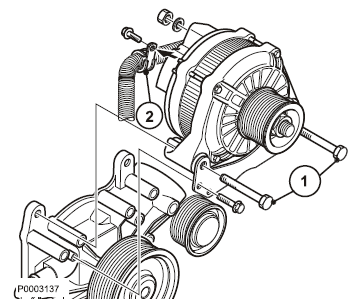
16 Connect the alternator cable connectors and reinstall the wiring clamp (2).
17 Connect the radiator hoses to the coolant pump.
18 Tighten the hose clamps (1, 2).
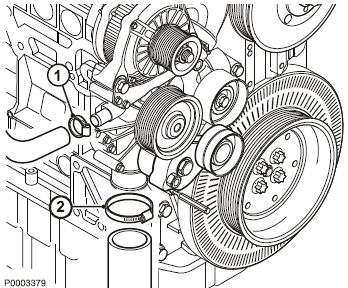
19 Free the belt tensioner and fit the belt.
20 Remove the drift (1).
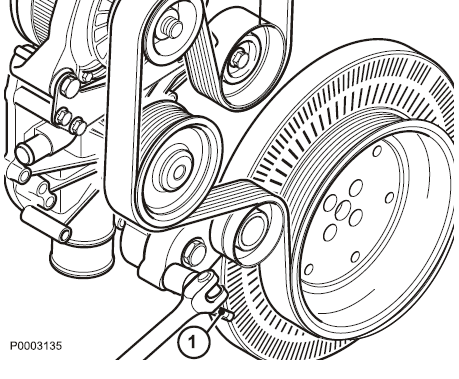
21 Fill with coolant and check watertight integrity.
Thermostat, Change
TAD550GE, TAD551GE, TAD750GE, TAD751GE
Removal
NOTICE! Be prepared to gather up fluids.
1 Drain the coolant so that the level falls below the thermostat; refer to Coolant, Change page 187.
2 Remove the coolant hose.
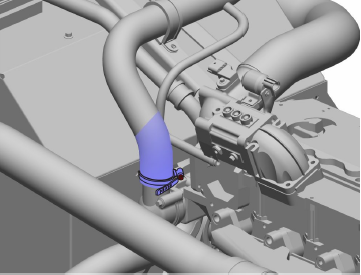
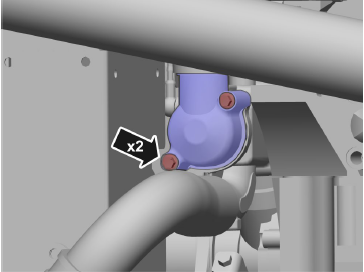
3 Remove the thermostat housing cover.
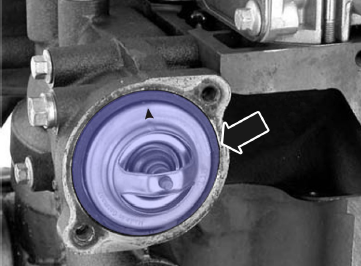
4 Remove the thermostat.
5 Clean and inspect the seal surfaces for both the thermostat and the thermostat housing cover.
Installation
6 Check thermostat function. Install a new gasket.
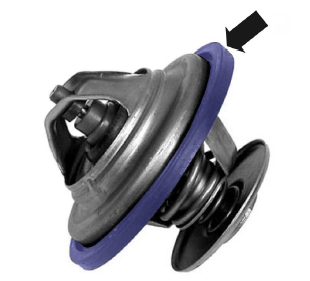
7 Install the thermostat with the arrow point upwards.
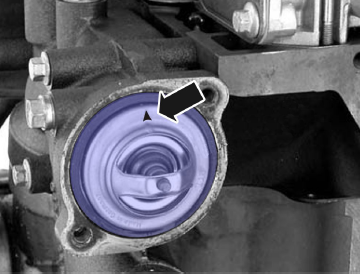
8 Install the thermostat housing cover.
Tightening torque: 30 Nm (22.1 lbf. ft.)
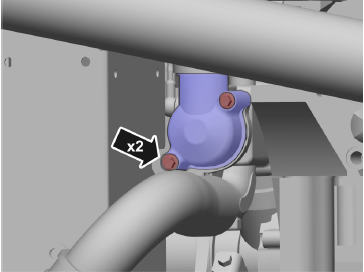
9 Install the coolant hose.
10 Fill with coolant according to Coolant Level, Checking and Topping Up page 185.
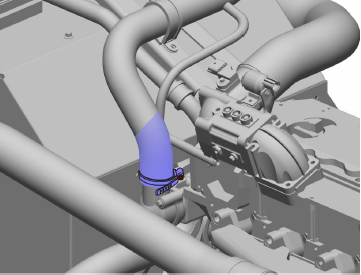
11 Check for leaks; check function.
Thermostat, Change
TAD752GE, TAD753GE, TAD754GE
Tools:
9992564 Drift
9998511 Lever
Removal
NOTICE! Be prepared to gather up fluids.
1 Drain the coolant so that the level falls below the thermostat; refer to Coolant, Change page 187.
2 Remove the coolant hose.
3 Remove the fan cowls; refer to 26-3, Fan, change.
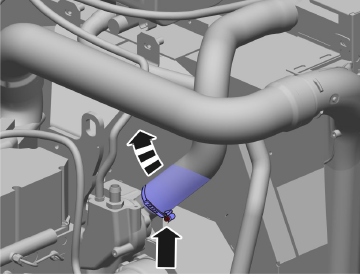
4 Remove the thermostat housing cover.
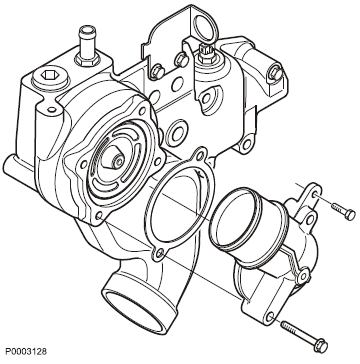
5 Remove the thermostat using suitable pliers.
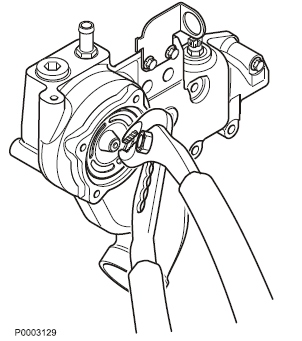
6 Check the rubber seal in the thermostat housing.
7 Where necessary replace the rubber seal.
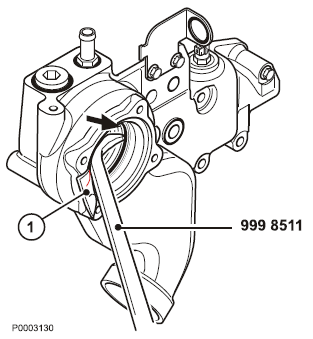
Remove the seal with the aid of 9998511 Lever.
NOTICE! Use a suitable insert (1) to protect the thermostat housing, which is easily damaged.
Installation
8 Clean the seal ring mating surfaces in the thermostat housing.
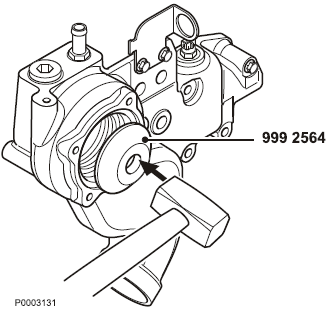
9 Install the seal ring with the aid of drift 9992564 Drift and a small mallet.
NOTICE! Make sure that the seal ring is positioned correctly (bottoms all the way round).
10 Install a new thermostat.
11 Install the thermostat housing cover.
12 Install the right fan cowl; refer to 26-3, Fan, change.
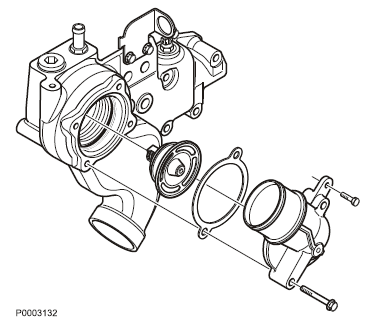
13 Install the coolant hose.
14 Top up with coolant; refer to Coolant Level, Checking and Topping Up page 185.
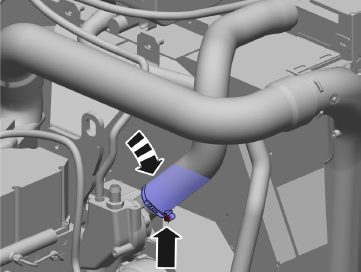
15 Carry out a follow-up inspection and make sure that no leakage is present.
Belt Tensioner, Change
TAD752GE, TAD753GE, TAD754GE
Removal
CAUTION! Pinch hazard. Keep fingers clear.
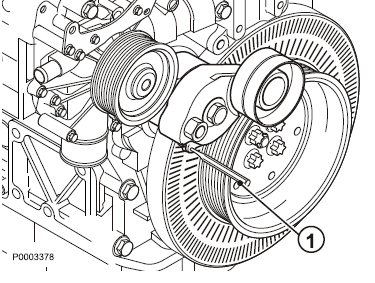
1 Release the belt tensioner and lock it in place with a drift (1).
2 Remove the drive belt from the coolant pump (2) first; refer to Drive Belt, Change page 204.
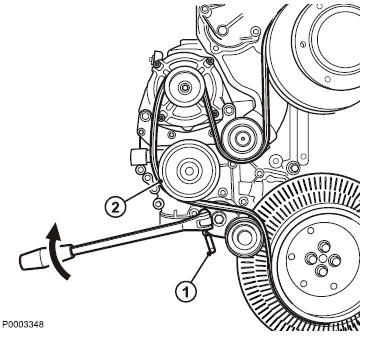
3 Free the belt tensioner and remove the drift (1).
4 Remove the belt tensioner retaining bolt. Remove the unit.
Installation
NOTICE! If necessary, replace the drive belt and inspect the idler wheel.
5 Install the belt tensioner.
Tightening torque: 42 Nm (31.0 lbf.ft.)
6 Free the belt tensioner and lock it in place with a drift (1).
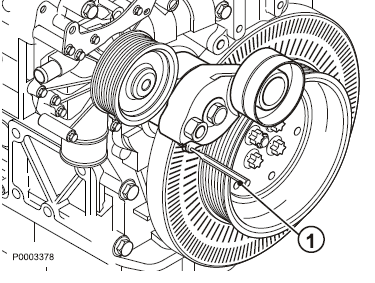
7 Fit the new drive belt according to the drive belt configuration.
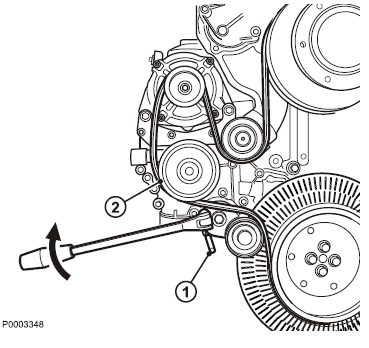
8 Remove the drift (1).
9 Check that the belt (2) is correctly aligned in the belt pulley grooves.
Drive Belt, Change
TAD550GE, TAD551GE, TAD750GE, TAD751GE
NOTICE! An inspection must be carried out after operation, when the belt is hot.
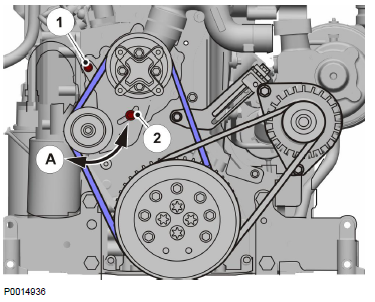
NOTICE! Belt tension is correct when the belts can be depressed about 10 mm (0.4") in between the pulleys. Drive belt, fuel pump and coolant pump. Drive belt adjustment
1 Undo the bolts (1 and 2).
2 Move the fuel pump in direction (A) until the correct belt tension is achieved.
3 Tighten bolts 1 and 2.
Replace
1 Remove the alternator drive belt; refer to Alternator, Change page 209.
2 Undo the bolts (1 and 2).
3 Press the fuel pump inwards toward bolt 2.
4 Remove the belt.
Installation
5 Install the new belt.
6 Move the fuel pump in direction A until the correct belt tension is achieved.
7 Tighten bolts 1 and 2.
Drive belt, alternator
Drive belt adjustment
1 Undo the bolts 1, 3 and 4.
2 Undo the bolt 2 on the back of the belt tensioner block.
3 Unscrew the adjuster screw 5 until the correct belt tension is achieved.
4 Tighten bolts 1, 3 and 4.
5 Tighten the locking screw 2 on the back of the block.
Drive belt, replacement
1 Undo the bolts 1, 3 and 4.
2 Undo the bolt 2 on the back of the belt tensioner block.
3 Screw in the adjuster screw 5 until the belt can be removed.
4 Remove the drive belt.
Installation
5 Install the new drive belt.
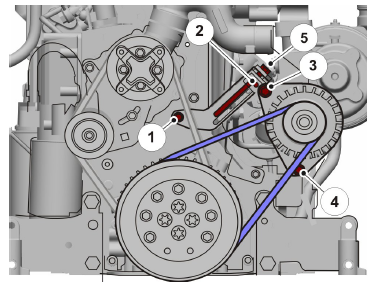
6 Unscrew the adjuster screw 5 until the correct belt tension is achieved.
7 Tighten bolts 1, 3 and 4.
8 Tighten the locking screw 2 on the back of the block.
Drive Belt, Change
TAD752GE, TAD753GE, TAD754GE
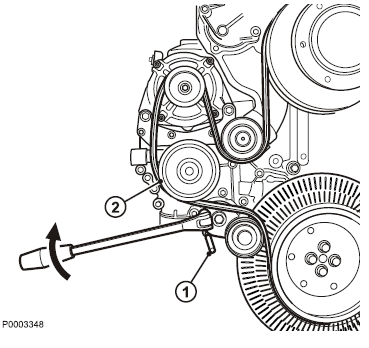
1 Release the belt tensioner and lock it in place with a drift (1).
2 Remove the belt from the coolant pump (2).
3 Check the function of the tensioner, the condition of the pulleys and the idler wheel bearings.
Installation
4 Install the belt.
5 Release the belt tensioner and the drift (1).
6 Check that the belt is properly aligned in the groove and correctly tensioned.
Thermostat, Function Check
TAD550GE, TAD551GE, TAD750GE, TAD751GE
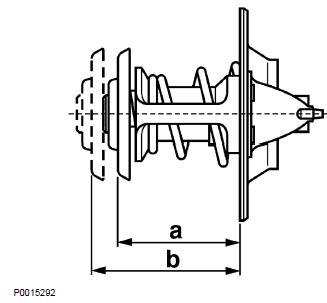
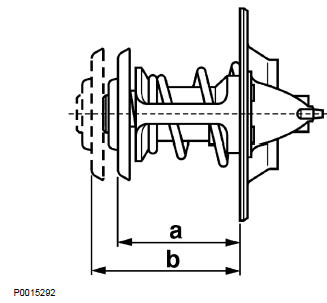
1 Measure dimension ”a” on the thermostat.
”a” = Thermostat begins to open: 87 ± 2 °C (T1) (188.6 ± 3.6 °F (T1))
”b” = Thermostat fully open: 102 °C (T2) (215.6 °F (T2))
IMPORTANT!
Maximum permissible pressure 135 °C (275 °F).
2 Heat the thermostat in a water bath.
NOTICE! In order to obtain the exact opening temperature, measure as close to the thermostat as possible without touching it. Stir the water constantly to achieve an even temperature distribution.
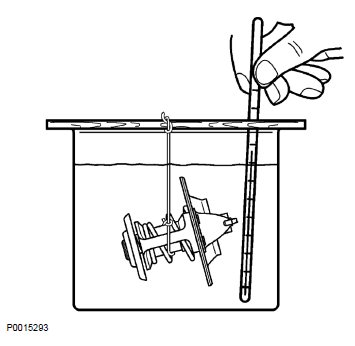
The temperature must not rise faster than 1 °C/min (1.8 °F/min), otherwise the moment of opening will be delayed.
3 Measure dimension ”b” on the thermostat. At opening temperature, 102 °C (215.6 °F):
”a”-”b”= min 8 mm (+1) (0.315" (+0.039))
Thermostat, Function Check
TAD752GE, TAD753GE, TAD754GE
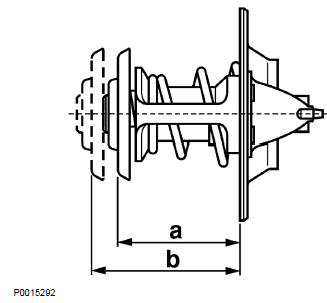
1 Measure dimension ”a” on the thermostat.
”a” = Thermostat begins to open: 86 ± 2 °C (T1)
(186.8 ± 3.6 °F (T1))
”b” = Thermostat fully open: 98 °C (T2)
(208.4 °F (T2))
IMPORTANT!
Maximum permissible temperature 130 °C (266 °F)
2 Heat the thermostat in a water bath.
NOTICE! In order to obtain the exact opening temperature, measure as close to the thermostat as possible without touching it. Stir the water constantly to achieve an even temperature distribution.
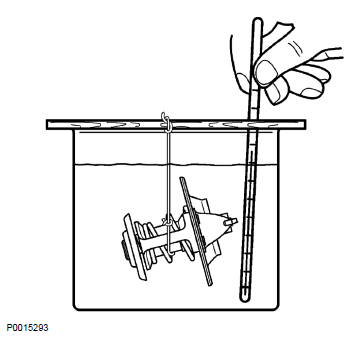
The temperature must not rise faster than 1 °C/min (1.8 °F/min), otherwise the moment of opening will be delayed.
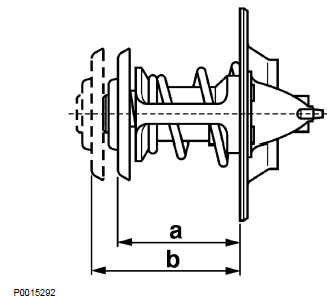
3 Measure dimension ”b” on the thermostat. At opening temperature, 98 °C (208.4 °F):
”a”-”b”= min 9.5 mm (+1) (0.374 + 0.039")
We supply Volvo Diesel Generator Set with power range from 68KW to 600KW. For more information, please contact us.
Copyright © Guangxi Dingbo Power Equipment Manufacturing Co., Ltd. All Rights Reserved | Sitemap
Update cookies preferencesseokeywords:
test2